Hi WWPD! Throckmorton here stepping in on my first official post as a WWPD writer. I'm really excited to join the team and lower the level of discourse around here a little bit.
So, without further ado I give you a complete review, build and paint of the new
British Cromwell Tank set from
Plastic Solider Company.
I love the Cromwell tank. I think it's my favorite Allied tank of the war, with the Chaffee being a close second. There's just something about the look of these guys that feels like World War 2 armor to me. Now that I'm working on an
Overlord Desert Rats army for my ever increasing
Flames of War collection I jumped at the chance to review these when I saw them available at my FLGS.
I have a love hate relationship with PSC. Their tanks are dirt cheap, and that's great for a gamer on a budget. They're plastic, so paint is less likely to chip off and, due to the molding process used to put parts on sprue, they're less likely to have serious manufacturing defects than other forms of casting.
However, multi-part plastic kits are not everyone's bag. Sometimes you just want to crack open a clam shell, slap some super glue on there and get priming. But my real issue with PSC, and it's in evidence here, is the fidelity of details on their soldiers and crew. I like chunky details in 15mm, it allows for more visually striking contrast on the table. Which I think is one of the keys to a good 15mm paint job.
Here's the stats rundown on the Cromwell from the wonderful
Easy Army website:
A light, smoke shooting tank that also comes in artillery bombardment form. This sounds like exactly what I want out of a tank. To bad it doesn't have .50 cals. But no girl is perfect right?
Now, on to the build and review!
 |
| Box beauty shot. 5 Cromwell's for a low low price. You can't beat that right? |
 |
| Oh, good sir, I plan on using far more than 3 paints on these guys. |
 |
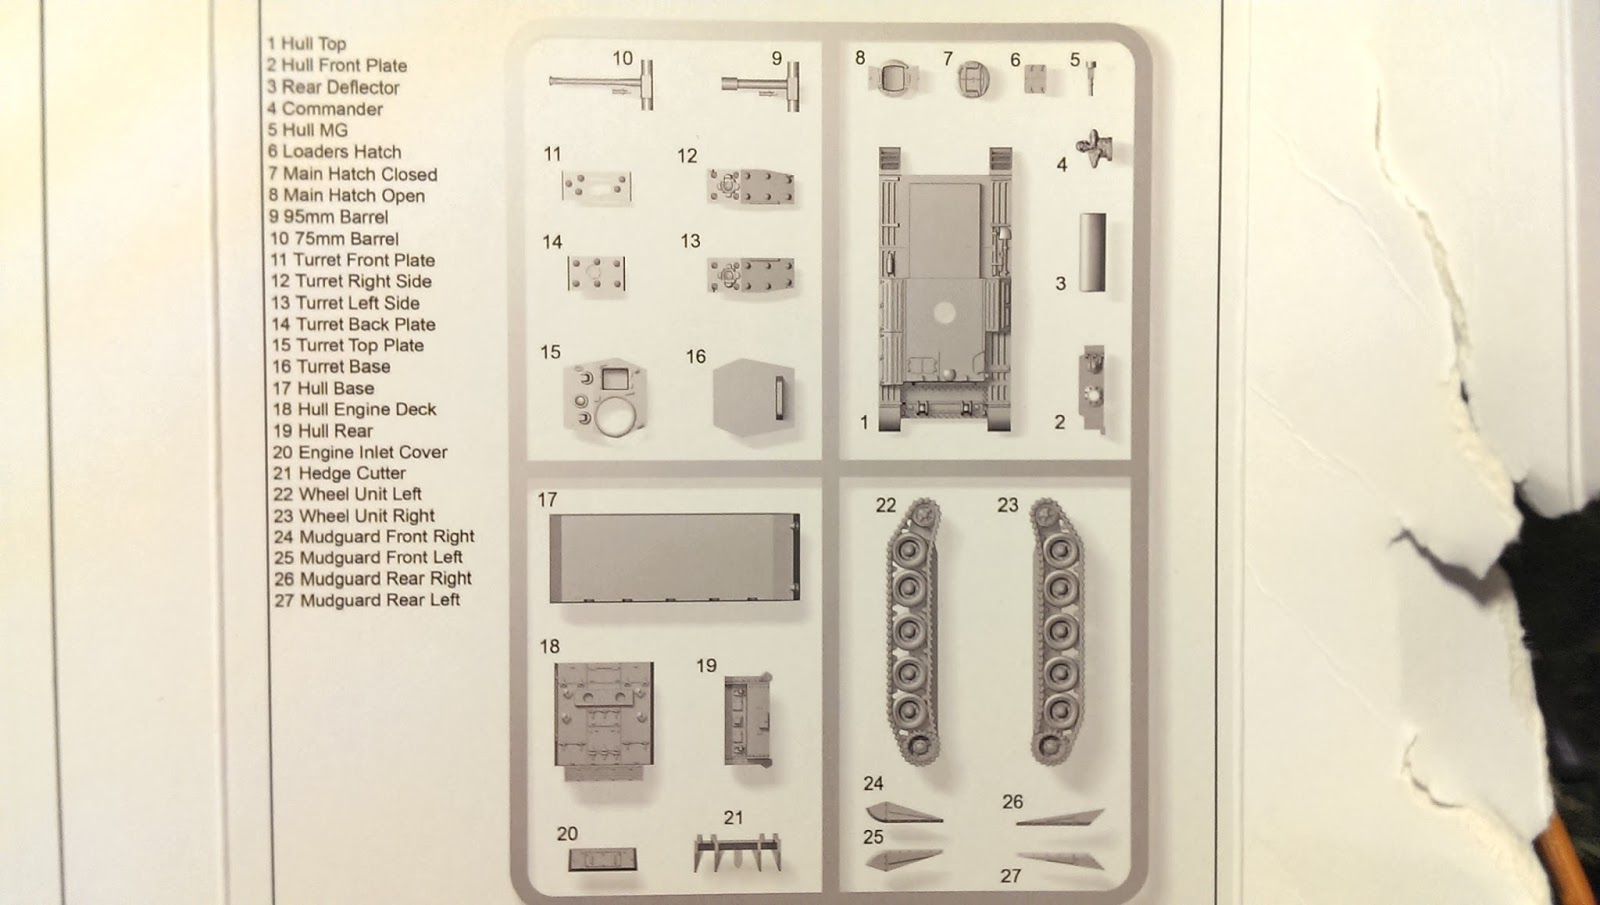
| Multiple part plastic kits should always have instructions. These, dear reader, are not instructions, just an inventory of parts on the sprue. |
 |
| This also used to be an insert in the box (on the Pz IV and Panther boxes I've bought in the past you could pull it out) Having to rip the full box open and lay it beside you is a bit unwieldy. |
 |
| Sprue shot! |
 |
| Each sprue comes with the option for either the CS or the standard gun. Great addition. |
 |
| Here's my biggest issue with all PSC products I've encountered, and the Cromwell set is no different. I just can't stand the way they do crew/dudes. These blokes are kind of flat and lifeless, especially in the face. Which is weird, if you look at Dirty Jon's Review of the M5 Half Track they look so much better than this. I like chunk in my models, plus size models if you will, they allow for better pop on the details with less fuss. |
 |
| Right, time to whip out the tools and get to building. See that glue in the center? If you ever think about building plastics you should stop what your doing, go to this link, and buy it now. It's Model Master Liquid Cement for Plastic Models and it's simply the best plastic glue I've ever used. It comes with a long thin metal applicator that makes putting a small amount of glue in tight spaces a snap. Accept no substitutes. |
 |
| One piece tracks. This is awesome. Thank you PSC for eschewing the multiple part track design you were using in earlier products and giving us a nice, solid, no non-sense hunk of track to work with. |
 |
| I like a weighty model in my hand at 15mm but cost of a PSC tank simply can't be beat. So, I just throw a couple of pennies into the body to get a little extra weight. There's not a ton of room in the Cromwell chassis, so I could really only fit 2 in there but it gives it enough heft to be servicable. |
 |
| Chassis construction. Complete with 8 parts. I forgot the inlet cover here, but no worries, it made it on to the model. The only thing that I find odd design wise is that the engine deck and inlet cover are separate pieces. I kind of get it with the inlet cover, but the deck literally slides over that back piece on the top of the chassis and sits flush. Sup with that? |
 |
| Chassis all built, except for the inlet cover, which I of course forgot. |
 |
| Track assembly, 3 pieces for each track. The back of each track has some nice mounting pillars which fit into some groves on the lower piece of the chassis. I'd like to repeat, this time with feeling, ONE PIECE TRACKS! Thank you PSC. |
 |
| All built! Here's a BF to PSC comparison. The PSC one is just a touch shorter and the details vary a bit on the front deck between the two. But all in all you really shouldn't be able to tell on the tabletop. |
 |
| Side guards on, these babies are quite thin so when taking them off the sprue and cleaning off the flash be very careful not to gouge to deeply. If you do it right, they'll sit almost (if not completely) flush against the side of the hull. |
 |
| Turret. This guy is a bitch. Straight up. |
 |
| Pro-tip 1. Put the gun into the turret front plate before you do anything else with the turret. It will make your life so much easier. |
 |
| Pro-tip 2: Build your turret plates using the top portion of the turret as your mount. There are little guide posts there that will help hold the turret plates in place. It can be challenging to get everything to line up right. Which bring us to: |
Pro-tip 3: DRY FIT EVERYTHING FIRST. You should, with out a doubt, use plastic glue (seen below again) for plastic models. One of it's great benefits is that it becomes tacky very quickly (as the two peices of plastic begin to melt together) so you can fit things and slide them around. However, a good fit requires you to ensure that all the pieces slide together and fit flush. If not, your turret will end up looking a mess. So, before your put the glue down fit all the pieces together to ensure there's not a molding error you need to shave down or a bit of sprue left on from when you clipped it off. Do it, you will save yourself time and heart ache.
 |
| PSC to BF Turret Comparison. Gun's a bit longer on the PSC one and a bit chunkier on the BF one. |
 |
| Ok, so I went a little crazy. PSC didn't give me any stowage (what's up with that?) and I don't really have any Brit stowage. I like it when my models have a little uniqueness to them so I decided to add some Hessian Strip camo to the tanks that would become the 1 IC and 2 IC for my new Desert Rats Overlord Army. It's a really simple process involving green stuff and a hobby knife. |
 |
| 1 IC, all tarted up. |
 |
| There they are, all built. |
 |
| And primed black with Krylon flat black. |
 |
| Then base coated Vallejo Russian Uniform. I use three watered down coats of paint to get to smooth finish with no brush strokes visible. |
 |
| Now, I wash the whole thing (with a focus on the recesses) with Citadel Athonian Camoshade. You can say a lot of things about the Games Workshop evil empire, but they make one hell of a line of washes. I use them almost exclusively. Also, they're in most hobby stores so you don't have to wait around and order them. |
 |
| Being very careful to leave the recesses untouched I go back over all the open, flat and raised bits with Vallejo Russian Uniform. This is the most time consuming part (other than painting tracks, I HATE painting tracks) |
 |
| Next, I knock out all the detail work. The Hessian Strips are painted Vallejo Khaki, washed with Citadel Agrax Earthshade and then brought back up with Khaki. Wood is Vallejo Beige Brown and metal Vallejo Gunmetal Grey. I wash the tracks with Agrax. |
 |
| Now it's time to prep for decals. I use a brush on gloss varnish (any will do) to block out the areas where I'm going to put the decals down. In this case the engine deck, the left and right hand side of the turret, 3 places on the front of the tank and 2 on the back. |
 |
| Using Battlefront's Late War British Decal Set my little tanks are starting to look like something more than green boxes. I always add my decals before I do weathering as they would get dirty and scuffed up as well. |
 |
| Note, one of the things you should always do with decals is use Micro Sol while they're drying. The Micro Sol stuff is simply layered over the drying decal. It allows the decal to conform to any weird shapes or bumps and softens the edges of the decal so that, once you've varnished the model, you won't even notice the decal lines. Sadly, I lost my microsol and wanted to continue with the project so I hit everything again with gloss varnish, cursed under my breath, and moved on to... |
 |
| The dirty bits! |
 |
| Vallejo makes an excellent line of Pumice that adds a level of grit and mass to the weathering process. I love the stuff, it just adds a great effect to the model and gives it a battle worn "I've been out in the field, wanna fight about it?" look. |
 |
| The stuff dries quickly as well. So, once I applied it, I gave it five minutes and then hit it with the Agrax Earthshade wash to give the dirt some depth. Then I whipped out my big dry brush and worked in some Vallejo Dark Sand. I do this not just over the dirt but other raised areas of the tank as well. Your eye sees lighter pale colors like dark sand in a way that matches it to the color underneath. Essentially, the under coat "bleeds over" visually. So it works as an excellent final step to give the model some pop without having to fine line or mix additional paints. |
 |
| Ok, last step. Matte Varnish time. I prefer a brush on varnish. Although, you do have to be careful for clumping. But, I feel like I can control my work better with a brush than with a spray can. It's really personal preference here. Although the bonus is I can varnish in a climate controlled space so I don't have to worry about clouding. Bonus points if you can name what I was watching on TeeVee while working on these. |
 |
| Here's the final product on the painting table. Not too bad I don't think. |
 |
| Rolling through town. |
 |
| Just some pimps, doin' pimp stuff. |
Score
Detail: 4/5 Hessian Strippers. Everything is crisp and clean. The panels and groves are deep enough to take a wash and draw a good visual contrast between them and the raised bits. The main gun being easy to snap and crew being under detailed for my tastes stop this from being a 5/5.
Build: 3/5 Hessian Strippers. The one piece tracks are awesome and everything fits together great. But no instructions and a tricky turret knock this down a couple of pegs.
Value: 5/5 Hessian Strippers. It's like 35 bucks for 5 Cromwell tanks that can be made into either the main version or a Cromwell CS. Most excellent bang for your buck.
Overall: 4.5/5 Hessian Strippers. The tank is great. I just wish I could switch out the main gun and crew with Battlefront gun and crew. That's all that keeps this from being a solid 5 out of 5.
Throckmorton is an avid llama farmer, part time Flames of War player and runs his own hobby blog: Throck Of War. Photos were shot using an HTC One on HDR set to ISO 1600.
Models provided by The Plastic Soldier Company