


Showing posts with label Converting. Show all posts
Showing posts with label Converting. Show all posts
Monday, April 24, 2017
Bolt Action: DAK converted Panzer III SPG
Labels:
Bolt Action,
Converting,
Germany,
Tutorial

Thursday, October 27, 2016
Bolt Action - German 'Stummel' Hetzer conversion
Labels:
28mm,
Bolt Action,
Converting,
Germans,
Rubicon Models

By Jakob Lotz
So a little while back I got my hands on a Rubicon Models Hetzer kit with the plan of doing a review. However since Bryan has already done a fantastic review on the kit (if you haven’t done so already I highly encourage you to have a look at it here) I felt like I wanted to do something different with this one. A wee search of the old internets later I had come across the seemingly extremely rare Aufklarungspanzer 38(t), Vollkettenaufklarer 38(t) or Jagdpanzer 38(t) mit 7,5 cm KwK-37 L/23.
Wednesday, August 31, 2016
Konflikt '47 - Converting Automated Carriers
Labels:
28mm,
Converting,
Konflikt '47
Friend of the LRDG cast, Stu Williams, has been working on an original, incredible looking Konflikt '47 British army built around a number of units of Automatons and Automated Carriers. You might have found his "work in progress" shots on the Konflikt '47 Facebook page. We were lucky enough to catch up with Stu and he has outlined how he went about making his original automated carriers. Enjoy.
Afternoon all, Old Man Morin at the LRDG Podcast and WWPD asked me to throw together a
quick "how to" article describing how to scratch build my versions of the Automated Carriers. So grab
a brew and I’ll explain my process to you.

Wednesday, August 3, 2016
Bolt Action - Converting a US T19 Half-track
Labels:
28mm,
Americans,
Bolt Action,
Converting,
Warlord Games

You may have heard me talking about another conversion I am working on, where I am taking a Warlord Games M7 Priest and turning it into a Priest Kangaroo or 'defrocked' Priest (full conversion article to come!). From this conversion, I have two of the 105mm howitzers from the Priests left over, while at the same time my brother had some Warlord M3 half-tracks he wanted me to assemble for him. So what better then to convert one of these half-tracks into the T19 Howitzer Motor Carriage?
Tuesday, July 19, 2016
Bolt Action - Greatcoat German Project
Labels:
28mm,
Bolt Action,
Converting,
Germans,
Warlord Games

I have always liked the look of Germans in greatcoats, but there are only a handful of figures on the market. They range in quality from poor to great, come in a limited number of poses, and usually cost more than your average figure. I've seen several people mix the plastic Winter Soviets and various plastic German kits from Warlord Games to make their own greatcoat Germans, so I thought I would give it a try.
Wednesday, June 1, 2016
Bolt Action - Converting up a Soviet SU-57
Labels:
28mm,
BA Unit Discussion,
Bolt Action,
Converting,
Rubicon Models,
Soviets,
Unofficial Unit

I recently got my hands on a M3 Half-track from Rubicon Models and had planned to add it to my Soviets as a lend-lease vehicle. While talking to the other guys at the Bolt Action Alliance about it, the idea of converting it into something special came up. With that idea I went off into the wilds of the internet searching for obscure variants of the M3 and it didn't take long to find the SU-57.
Friday, May 27, 2016
Bolt Action - Making a Land Mattress
Labels:
28mm,
Americans,
BA Unit Discussion,
Bolt Action,
British,
Converting,
Eureka Miniatures

Hey guys, this week I take a look at the American artillery choice that is the Land Mattress. A while ago this little gem popped up in Easy Army and I gleefully rubbed my hands together. Playing against Garratt, I'd faced the fury of the multiple launcher before but other than the Sherman Calliope, the Americans didn't have access to the equivalent of the dreaded Nebelwerfer. Then along came the Land Mattress in the Battleground Europe Theatre Book. I immediately did some searching on the internet and was wholly disappointed to find that no one seems to produce a 1/56 scale model for this great little piece.
Friday, January 29, 2016
Bolt Action - Creative Composition for Miniatures
Labels:
28mm,
Bolt Action,
Converting,
Modeling
By John Brader
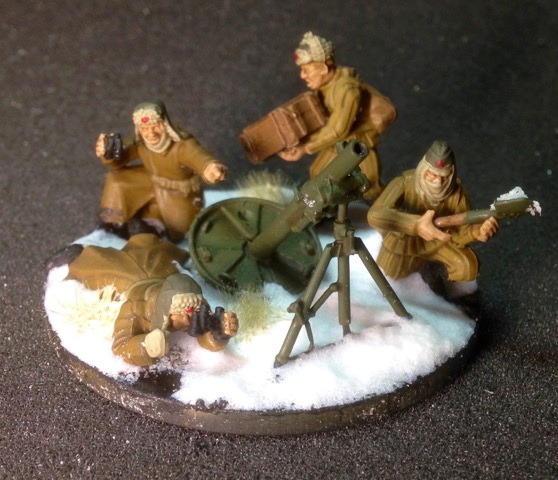
The saying goes, “A picture is worth a thousand words.” Well, if that’s true, then a well composed miniature can convey a whole story. Composition, or the way the elements of a piece relate to one-another, can often take a mediocre painted miniature and make it grand or ruin the effect of a stellar painting project. The techniques demonstrated here are subtle but intended to give you ideas about how to use “story” and composition to take your figures to the next level.
Friday, January 8, 2016
Bolt Action - Creating Greatcoat Japanese in 28mm (Part 2)
Labels:
28mm,
Bolt Action,
Converting,
Japanese,
Warlord Games
By: Old Man Morin
 Last week, I wrote an article detailing how to create IJA (Imperial Japanese Army) infantry models wearing greatcoats and cold weather gear. Although most people don't usually think of Japanese forces wearing this kind of gear, they did so during their campaigns in China, Manchuria and Alaska. Soldiers wore mittens, gloves, coats, uniforms, hats and helmets to protect themselves from the elements.
I wanted to create an army that looked original and was thematically linked to an era of a specific conflict. In this case, Japanese forces during the 1930s in China.
Read More
 Last week, I wrote an article detailing how to create IJA (Imperial Japanese Army) infantry models wearing greatcoats and cold weather gear. Although most people don't usually think of Japanese forces wearing this kind of gear, they did so during their campaigns in China, Manchuria and Alaska. Soldiers wore mittens, gloves, coats, uniforms, hats and helmets to protect themselves from the elements.
I wanted to create an army that looked original and was thematically linked to an era of a specific conflict. In this case, Japanese forces during the 1930s in China.
Monday, December 28, 2015
Bolt Action - Creating Greatcoat Japanese in 28mm (Part 1)
Labels:
28mm,
Bolt Action,
Converting,
Japanese,
Modeling

 When we think of Japanese soldiers in WW2 we most often envision veteran jungle fighters in threadbare, tattered thin cotton uniforms charging out of the jungle in a last ditch effort to slow the unstoppable allied island hopping campaign as it drove unrelentingly towards the Japanese mainland. It is an iconic image that has been portrayed on television, in countless books and numerous films. Although this popular image was an accurate portrayal of some Japanese forces, it is not representative of a huge number of the Japanese soldiers that fought in WW2. The War for Japan started in the early 1930's in Manchuria, throughout China and along the Russian border. Areas not known for their warm and temperate climate. Clearly the soldiers that fought there wore something that was a little more appropriate to their environment. In the case of Japanese soldiers, many wore greatcoats over their standard uniform. Wanting to make something that looked different on the table top, I sought to recreate soldiers wearing these uniforms and cold weather gear.
Tuesday, September 22, 2015
Bolt Action - A Conversation about Conversions
Labels:
28mm,
Bolt Action,
Converting,
Modeling
 By Jakob Lotz
((Jakob recently flew down to Australia from his homeland of Sweden, to play in the BAMA Bolt Action Tournament. He brought a host of awesome converted vehicles with him, some which you may have seen in the Warlord newsletter, and we were so impressed we asked if he could discuss them with us. So sit back and enjoy! - Anf))
Monday, September 14, 2015
Bolt Action - How To Turn An Opel Blitz Into a Maultier Half-Track Truck
Labels:
28mm,
Bolt Action,
Converting,
German,
Modeling
 By Old Man Morin
Greetings Bolt Action fans,
Old Man Morin here with a handy dandy guide on how to turn your everyday German truck from a 6 wheeled transport into a half track truck.
Now, you may think that this is an easy switcheroo or the rear wheel assembly and on a basic level, you would be right but...this process is not as easy as it seems.
Wednesday, April 22, 2015
Bolt Action - Conversion Competition Winners!
Labels:
28mm,
Bolt Action,
Community,
Competition,
Converting,
The Assault Group
We recently wound up our conversion competition, sponsored amazing companies, The Assault Group and Campaign Books and Games Logistics. The calibre of the entries was incredible and made choosing 5 winners incredibly difficult.
Read More
Both these companies offered up some great prizes, so if your after some great quality 28mm miniatures, including great lines of Marines, Japanese, late-war Germans and more, check out The Assault Group. And if your in Australia, Campaign Books and Games Logistics stocks a wide range of JTFM, Osprey and Warlord products, amongst others.
Monday, April 20, 2015
Star Wars Armada - LED Engine Tutorial

Over the weekend I decided I'd crack open some Victory Class Star Destroyers from Fantasy Flight Game's new Star Wars Armada title in order to install some LED lighting inside the engines. I had never done anything like this before, and could not find anything online to show me exactly how it could be done. It took a little bit of crazy, I'll admit, to put the saw to my two Star Destroyers without any idea that the project would even be possible, but I'm pleased with the results. A step-by-step guide for you to use, if you're so inclined, follows after the break.

You'll need many of the products shown above in order to attempt this project. I'm sure a creative or insanely hard working person could accomplish it without the Dremel, but I wouldn't suggest attempting it. Then again. some guys built pyramids a long time ago without Dremel tools, so anything is possible!
The list of stuff I used:
LED Lighting Kit (purchased here)
Electrical Tape
Scissors
Utility Razor
Razor Saw ("Pull Saw Blade" made by Excel and sold for about $4 at craft stores)
Tiny File
Super Glue
A Nasty Old Paint Brush (or whatever else you have laying around that's non-magnetic)
Extremely Small Magnets (try searching "tiny neodymium magnets" in your browser)
Semi-Permanent Putty (I used Loctite "Fun Tak")
As I mentioned before you could get by without almost any of the above. For example, you could skip the "Fun Tak" and glue everything in place. I preferred to have a less-than-permanent hold for all my wiring. I have listed everything I used, but feel free to experiment on your own, since this entire project was its own experiment in the first place.

Once everything is assembled, stab your precious little Star Destroyer with a thin razor. Twist it slightly as you do. You'll soon find that while a certain degree of caution is wise, this model is pretty durable and resistant to abuse.

You should run the blade up and down the edge of the ship. The seam is found directly below the top half of it. You will quickly find exactly where the glue is you'll next be sawing out. You could probably use your razor blade, but I didn't have the requisite patience. You'll notice this is a recurring theme!

A few swipes with the very thin saw and the first of five bonds is done for. The glue bonds to saw through are on both sides of the ship, in the same place.

The second bond is sawed through quickly as well. Remember the same bond is on the other side.

This bond at the front of the ship goes all the way across. It is readily cut.

Once the front bond is cut, you can pull the front apart easily.

There are pegs and holes inside you'll need to lever apart.

Don't forget to cut the final two bonds at the back of the ship. You should be able to separate it afterwards with just a bit of leverage.

Once the ship is separated, the gutting begins! Cut every vertical peg you see out of the thing. Note, the horizontal pegs that make up the inside of the engines should be ignored at this point. Here's a spot where I suppose you could do this without a Dremel, but it really made it easy to have one on-hand.
A few shots down you can find an image of the inside of the ship after its gutting. Remember to cut the vertical pegs and leave the horizontally-situated cylinders alone for now.

Once the inside is hollowed out as much as possible, drill a neat hole into the center of each engine. The sculptors at FFG were very nice to provide us with circular guides for our drills.
Drill the inside of the engine out as well so that the light can shine all the way through. I hollowed out larger openings on the inside to accommodate the light emitting diodes which would soon be placed inside.

You'll probably be melting plastic as you drill. This means you will occasionally be left with unwanted molten plastic flows, as you can see in the image above within the center engine. This can easily be cleaned away with a small file.

At this stage, take your ridiculously tiny magnets and glue them at the points pictured above. The manufacturer kindly left circular target areas on the back corners that help you easily line up the magnets.
If you've never worked with tiny magnets before, remember that when you forget which side sticks the way you want it to, you can drop it back into the package of magnets. The magical mystery science will show you the way as your magnet connects with the others inside the container. Also, remember they're magnets, so many metal tools won't help you here! I used the old, beat-up paint brush at this point to position the magnets into super glue. Give the magnets plenty of time to dry before testing the magnetic bond of your ship!

While the glue dries your magnets into place, you've got some electrical work to do. The lighting kits I purchased came from www.lightsforminis.com. "Chip Light Kits" can be purchased from this site, and selecting one of these allows you to be sure you'll have everything you need. Pictured above is one of the kits, with three LED chip-size lights selected and 8" wire. The light color chosen was "cool" rather than "warm". The "cool" color was much bluer and therefore more appropriate to simulate the engine light radiance we see in the films. One three-chip LED kit will set you back about eight bucks.

These kits look more complicated than they are. Remember, I had never done anything like this before this weekend. You basically just wrap red wire to red wire, and green wire to black wire. That's it! I wrapped the twist points with electrical tape after attaching all the wires.

You'll want to coil the wires around the switch at this point, in order to make sure that the entire electrical assembly fits inside the hollowed-out ship.

Use the Fun Tak to semi-permanently affix the battery in place, as well as the switch as pictured above. At this point you should make sure each individual light chip reaches the hollowed-out areas on the inside of each engine. Adjust the position of the wires as needed at this point before "Fun Tak"-ing them into place.

Next, put a piece of Fun Tak on the back side of the LED chip. Position the chip at the engine, where you have previously checked to see if they would fit appropriately.

Once the light is placed centered inside the engine so that the light fills the entire drilled hole, press the Fun Tak into place around the light. It will hold the light in position, but allows you to adjust it later if something happens, or remove it to change the battery, etc.

The above picture shows the light held in place with Fun Tak. Repeat this process for the remaining two LED lights. Once all three are in position, use some Fun Tak to hold the wires in place against the inside of the hollowed-out hull.

Once everything is secured - but the switches are still accessible - you can put the two halves of the ship together and mount the ships on their bases. In a sunlit room, the Star Destroyers should now look like these do above.
Kind of cool, huh? It took about three hours from start to finish. I'm not the sort of guy that generally goes off the deep end like this, but I blame the current lack of product for my odd burst of ambition. See what you've forced me to do, Fantasy Flight Games? Just release the rest of Wave 1 already, so I can throw money at more toys and less lighting effects!

This is a shot of the Star Destroyers in a very well-lit room. Clearly the effect is lessened if the area it's being used in is particularly bright.
Three hours later, I'm sure I'll do this for my final Victory Class Star Destroyer since I've already done it for these two. Time will tell if I will do it for the Imperial Class Star Destroyers as well. Now what I'm really looking forward to figuring out is how to light up the reddish-orange thrusters on those Rebellion ships!
Want to join the conversation? Please sound off in the comments below, or let us know on our forum!

Thursday, April 16, 2015
Bolt Action - Putting Chains on Your Winter Vehicles
Labels:
28mm,
Bolt Action,
Company B,
Converting,
Modeling
 Welcome back Bolt Action fans!
Old Man Morin here, as discussed on the most recent Ghost Army Podcast, Anfernee recently challenged me to take my hobby to the next level while updating the vehicles for my Battle of the Bulge Americans. He saw that I was painting all my vehicles in variations of weathered white wash and the Rocket Man wanted more. He pointed out that many wheeled vehicles in the Ardennes in December of 1944 had... chains on their tires. Now I am never one for doing things the easy way so away I went and I thought I would share the process with you.
Tuesday, February 24, 2015
Bolt Action - Boltaction.net Conversion Competition 2015
Labels:
28mm,
Bolt Action,
Community,
Competition,
Converting

Time for another exciting Boltaction.net reader/ listener competition. In the past we have ran painting competitions. This time we are going for something a little different. Conversions. What constitutes a conversion? Well, that is simple. Did you change the model from its original form? If so, well you have converted a model.

Wednesday, January 28, 2015
Bolt Action - Scratch Building A Blacker Bombard
Labels:
28mm,
Bolt Action,
Converting,
Indians,
Modeling

One of the things that I love about Bolt Action, after years of play, is finding weird little entries for vehicles and units in "The Armies of..." books that I had skipped over when creating lists for armies. This has been especially true in my last couple of armies where I have intentionally gone out of my way to find entries and unit types that I have never used before. Well, thanks to DaveOwaR, I have found a new unit for my Indian troops that I must have read past 100 times when reading the British book. The Blacker Bombard. What is this weapon you may ask? Well, let's find out!
Thursday, October 30, 2014
Bolt Action - Modeling German SPG Crew Using Wargames Factory Germans.
Labels:
28mm,
Bolt Action,
Converting,
Germans,
Modeling,
Wargames Factory

I recently got on a role converting Wargames Factory plastic Germans into crew for my German self propelled gun (SPG) collection. I have always hated opened top self propelled guns with ghost crew look. I want my models to look alive and full of action, I want my SPGs to look less like a tonka truck and more like the WW2 pictures and and documentaries I grew up with. I am also as addicted to modeling and painting as I am to playing, so this kind of stuff is up my alley.
Thursday, October 9, 2014
Bolt Action - Modeling German Tank Commanders with Wargames Factory Germans
Labels:
28mm,
Bolt Action,
Converting,
Germans,
Modeling,
Wargames Factory

Life is settling into the inevitable winter her in the northern most reaches of America. With fewer house and more nip to the air I took it upon myself to make some much needed command figures for my sprawling German tank force. Previously I had been using German markers Allies and Axis from to identify my German command tanks, but this looked tacky. I try to keep a plastic box of German and Soviet infantry laying around for needed odds and and ends or the occasion conversion binge. I got the itch to convert and went to town on a whole mess of vehicles.
Sunday, June 1, 2014
Bolt Action - 28mm Soviet Cossacks
Labels:
28mm,
BA Unit Discussion,
Bolt Action,
Converting,
Modeling,
Soviets

After successfully building Soviet Cavalry using Perry’s ACW Cavalry and Warlord Plastic Soviets, I decided to attempt to make a unit of Cossacks as well. I followed the same steps when building my Cossacks as I did for my regular Soviet cavalry. The only difference was the types of heads I used. Instead of helmeted Soviet heads, I used the Soviet heads with fur caps found in the Warlord set. Before gluing the heads in place I cut the ear flaps off the top of the head so that the fur cap was flat to form the crest of the Cossack hat. This allowed me to paint on the Cossack crest and cross. The plastic set from Warlord only has ten heads with fur caps, making it two short of the twelve needed to match the Perry set. Lucky for me I have bought four sets of Warlord Plastics over the last year and saved the left over bits each time. Since most the previous figures I built had helmets, I had plenty of left over heads with fur caps. I had so many extra fur hat heads that I will be able to build a sufficient number of dismounted Cossacks with the remaining plastic bodies. This is a good example of why you should always save all of your bits.
Subscribe to:
Posts (Atom)
Popular Posts In the last 30 Days
-
 Many people have asked about using the "Battle Recorder" that was recently implemented into World of Tanks. As a note, only users...
 -
This was the 6th and final battle of Turn 1 in our Firestorm game. The Germans again win the initiative and move to cut off the Soviet Bor...
-
 Over the weekend, Joe (Jmezz), Judson (of BA.Net) and I all got to try out a game I've been wanting to play for a bit called Shadows Ov...
 -
Mid War German Czech Panzer Company vs Soviet Strelkovy. This is the first full game of FOW I've hosted at my place, though I've pla...
-
 By Dirty Jon Tom "The Crotch" DeMayo and I got together for a pre- Muster throwdown. I wanted to test out my new tournament lis...


