Related Posts Plugin for WordPress, Blogger...

Saturday, March 31, 2012

Behind the Scenes of the Live Podcast

At Cold Wars, held at the Lancaster Host Resorts on 3/8/12 the WWPD team held a live podcast. The typical crew of Steven, Luke, and Dirty Jon hosted the podcast and were joined by fellow WWPD staff, Chris H., Chris M., and Big Ted. The full album is located on my dropbox account here: http://bit.ly/FOpuqW

Here are a few selected pictures from the Podcast:


Read More

Friday, March 30, 2012

Flames of War Statistics 101 (pt 2)

Post by Eric Riha
Hello Again Everyone,
I’m back again to continue our conversation on FoW Statistics. Last time we talked about Expected Values in Flames of War, how to calculate them, and how these values can help us make better tactical decisions on the battlefield. Today I’m going to talk about the lesser known, but often better ‘remembered’ Potential Value.


If you need a quick refresher on Expected Value, you can find the previous article here.
Much like Expected Value, Potential Value is exactly what it sounds like: the ‘potential’ number of successes or failures out of a set of conditions. Potential Value helps us make tactical decisions in two ways: proving certain shooting options are better than others, and providing the foundation for ‘tactical pessimism’.


The first point relates to certain shooting/tactical options one usually has with American Tanks (Stabilizers) or any other situation where you have the option to fire two shots at 6’s to hit or 1 shot at 5’s to hit.


Read More

Thursday, March 29, 2012

Magnetized ISU 152/122 Regiment Completed!


This is a follow up to this post, so I'm not going to revisit the history of the ISUs.  Instead, I'll briefly talk about magnetizing them and show off pictures of the complete unit!

Read More

Flames of War Statistics 101 (Pt 1)

Hey Everyone,
Eric Riha reporting for guest article duty!
A friend of mine sent me a link to Tom De Mayo's excellent "Tank on Tank Love" article and I enjoyed seeing the oft forgot FoW Math on display – so much so that I felt the community could use a follow-up article (or three). The concepts explored in Tom’s article are very important in FoW, and provide a great lead-in/opportunity to talk about two other key concepts in the world of FoW Statistics: Expected Value and Potential Value.
In this first article of the series, I'll cover what Expected Value is and how to calculate it. In future articles, I'll talk about how it relates to Potential Value and (the important part) how to translate both of them into applicable tactics on the FoW board. I'm also going to cover this from the very ground up, so bear with me if I start too slow for you!

Expected Value is exactly what it sounds like it is - what you should expect to roll out of a set of dice. Since we know there are only 6 results possible for each die roll, we can predict the Expected Value or Result of an action based on a certain set of conditions.

For example, let's take a quick look at infantry saves. The only condition in this setup is that infantry save on a 3+. On your standard 6-sided die (which is all we use in FoW - no d8's allowed!), that means you pass a save on a die roll of 3, 4, 5 or 6 and fail on a 1 or 2. Statistically, this means your possible rolls result in a fail 2 out of 6 times (or 1/3rd) and a success 4 out of 6 times (or 2/3rds).
Individual Expected Values don't tell us much (an expected save of .66666~ doesn't really mean anything), but it allows us to make educated guesses regarding what to expect in a set of dice. For instance, if someone shoots at me and hits 3 infantry teams, I should Expect to roll 2 infantry saves and 1 failure.

Now, most of you probably already figured that last part out, but things start to get more complicated as we add more and more conditions to our equation. And calculating Expected Values are important because they give us a roughly 'average' result. If I have 5 stationary Sherman 76's shooting at a platoon of 4 StuG G's, concealed and at long-range; how many StuG's should I expect to kill? Is moving to close range with reduced RoF, but lower To-Hit numbers and Armor saves better for me? It is here that we can see where these calculations pay off. I should also mention that these types of equations should all be worked out before each game - taking 10-20 minutes to figure out the exact odds in the middle of a round might negatively impact your Sportsmanship score!

So let's use that first situation as another example. What are the conditions the bound this scenario?
5 Stationary Sherman 76's = 10 Shots
Sherman 76 Main Gun = Anti-Tank 12, Firepower 3+
Confident, Vet StuG = 4+ to Hit, +1 for Concealed, +1 for Long-Range = 6 to Hit
StuG G = 7 Front Armour, +1 for Long-Range = 8 Front Armor

Now, let's walk through the steps in FoW from shot to killed tank:
First, we roll to hit. Based on the above conditions, we have a 6 to hit which means we will score a hit on the StuG 1 result out of 6 possible results.

Next, out opponent rolls an armor save. Based on the above conditions, we have a 12 AT to an 8 FA. Since we are looking for kills, we will ignore Bailed Results (ties). [As a brief aside, it is always best to ignore bails in your calculations as you should ALWAYS expect your opponent to roll to remount his tank.] This means our shot will penetrate the armor of the StuG when our opponent rolls a 1, 2, or 3 - 3 results out of 6 possible results.

Lastly, we must successfully roll a Firepower test to destroy the StuG G after its armor is penetrated. With a 3+ Firepower, we know that 4 out of 6 possible results will destroy the tank.
Now that we've walked through the steps in the game, creating Expected Values for each step, we need to combine those values together to produce a singular result. We do this by multiplying the fractions created by each step.

Now, multiplying fractions is actually easier than is sounds. Split the top numbers (numerators) and the bottom numbers (denominators) into separate equations. Multiply each set of numbers separately to get the numerator and denominator of the cumulative Expected Value. Now stick those last two numbers into your calculator to get your final result.


Based on our calculations, we should expect to kill .05556 StuG G's for every 76mm Sherman round. With 10 shots from 5 stationary Sherman 76's, we would expect to kill .5556 StuGs - or a little over "half a StuG". Terrible odds indeed! In 'on-table' terms, we should not expect to kill anything in that StuG G platoon.


Moving to close range (with the StuG's still Vet + Concealed) gives us the following equation:
So we would expect to kill .14815 StuG's for every 76mm round. At 5 shots, that gives us an Expected Value of .74 killed StuGs - better, but still not all that great.


Since none of the options above result in a single dead StuG, we know that if the above situation pops up in one of our games - we probably shouldn't take either of them! However, we can see that moving to close range (-1 to hit, -1 to armor saves) usually makes up for a reduced RoF and can use this as a general rule going forward.

And that's what Expected Values are really for - building a set of 'general rules/guidelines' for maneuver on the FoW board. By calculating these scenarios ahead of time, we provide ourselves with an expected result for each of our actions. Most ‘real-world’ scenarios on the FoW board will never match exactly with what you work out 'in theory'; however, the general concept of each mock engagement remains the same a majority of the time.
Calculating Expected Values also helps us re-align our expectations with reality, since we all 'usually' remember about "that one time where that one 105mm battery took out, like, 5 Panthers and it was really awesome - and I can't understand why it's not working this time....."

And since there are SO MANY different combinations of the above scenario (Panthers vs IS-2's, Sherman 75's vs Panzer IV's, Cruiser Mk IIIa vs. Panzer IV F, Concealed vs. Open, etc.), it is best to work them out for your specific army list vs. your generally expected opponent(s).
It is also a good idea to see where the 'turning point' is - what does it take to make each scenario "worth it"? Do you need more Shermans to get that StuG kill? Do you need to wait until they move out of cover? How many shots do you need to get that 1st Expected dead StuG?

So try some on your own, and join me next time when I talk about our next topic: Potential Value!

Eric Riha
FoW Mathamagician

Read More

Wednesday, March 28, 2012

US 3rd AD vs Gepanzerte Panzergrenadier


Sean was eager to try out the Gepanzerte Panzergrenadiers in V3 on the Western Front, and over the excitement of the pending Blood Guts & Glory, I was anxious to try my hand at US armor once again! We rolled for the mission and got "Counterattack".

Read More

New World of Tanks Clan Logo!


As a clan, WWPD 1st Panzer Div. has never implemented a clan logo mainly because of lack of need. It was mentioned in several patches that logos would be placed on tanks but this was never actually an option... until now!

A stealth patch occurred (server side that is) on March 27th that finally enabled the long awaited logos to be featured on the tanks. Originally, clan member Stealth_Eagle had a few rough designs, but with the logo never appearing on tanks, progress on his end was halted. Thanks to quick spotting of clan members that the logos were finally enabled, Darqueling (myself) and VonChoker (assistant leader) took it upon themselves to quickly create a sharp image that represented both WWPD in style and meaning. The result is the image above, the US 2nd Armor emblem modified and recolored by Darqueling with ideas from VonChoker. The colors are those of the WWPD logo with tweaks in the lightning bolt and lettering for visibility reasons.

We now proudly display the logo on our tanks in all battles and are quickly prepping for our first venture into Clan Wars!


In the garage, the logo is displayed next to the player's name along the top as well as on the front of all tanks so everyone knows what clan you are a part of! It looks beautiful on the front of my E-75.


Some enemies tried to scratch the newly painted logo off the front of my T-34 (American) but quickly became 4 more "kill rings" on my gun's barrel.
Read More

Tuesday, March 27, 2012

After Hours Episode 17- Post Biscuits and Gravy

After Hours 17- After recording episode 34, we keep rockin' and rollin'!  We talk a lot about TV and movies, lists we plan to run in V3, and generally shoot the breeze.  We also continue making fun of Luke for dropping the "H" out of 'UGE.  We won't give up on that, sorry dude!


Add to Cart

View Cart

Read More

Monday, March 26, 2012

WWPD News From the Front Episode 34

"Double Dipthongs."


The dudes have a new intro and a new outlook!  They're joined by Jasper Oorthuys from Wargames Soldiers and Strategy Magazine, talk some Bood Guts & Glory, and other Various Version 3 goodness!


TABLE OF CONTENTS:
  • 0:00 ACT I: Intro, What We've Been Up To, Blood Guts & Glory Preview Discussion
  • 0:40 ACT II: Interview w/ Jasper Oorthuys from Wargames Soldiers & Strategy
  • 1:08 ACT III: NooB Zone (warrior teams), Terrain in V3, Modeling Hills, Painting Flesh
Download this week's episode directly: 
http://ia601201.us.archive.org/2/items/WwpdNewsFromTheFrontEpisode33_523/Episode34.mp3
Subscribe via iTunes: http://itunes.apple.com/us/podcast/wwpd-news-from-the-front/id398903039
Subscribe with other: http://feeds.feedburner.com/WWPDPodCast
Links discussed in this episode:
http://www.odms-club.com/convention/
http://www.flamesofwar.com
http://www.wssmagazine.com/cms/


 EDITOR'S NOTES:
It was nice to be back in the studio and settling back into our usual routine after Version 3.  I promise we'll talk "crunch" from Blood Guts & Glory soon!
Read More

Sunday, March 25, 2012

Saturday, March 24, 2012

Kerr & King Pioneer Set Review


Fortification - Pioneer Set (Item #KK-204) 25.50 USD
0.5 Gauge Scenic Barbedwire (10 metres) (Item #KK-080) 7.95 USD
By Brian
Recently a gaming buddy of mine decided to put in a large order with
Kerr and King (http://www.kerrandking.co.uk/). For those of you who
have not heard of them before they produce a wide range of wargames
scenery, terrain and accessories in various scales. Being in the UK
usually means high shipping prices across the pond. However, a minimum
order of £20.01 (about 32 USD) you get free shipping, whoot! That
being said I have had my eye on their Pioneer Set for some time. Due
to Battlefronts restructuring of their wildly popular Battlefield in a
Box range it has become ridiculously expensive (80 USD) to buy the
needed boxes to produce the elements of a Pioneer platoons
fortifications (3 Barbed wire, 1 Minefield). So if you are just
looking for the four obstacles for your Pio's this is a solid
investment.

Read More

Friday, March 23, 2012

British Paratroopers vs German Panzergrenadiers

Jon and I were anxious to get back to the Western Front and run some lists we were excited about. Jon wanted to get back into Brit paras, and I was excited to try the Generic Gepanzerte Panzergrenadier force out of Forces.

We rolled for the mission and came up with Breakthrough.

We played for a very long time, and thus I sort of lost track of some pictures.  Consequently, this is going to be another summary-heavy battle without a turn by turn breakdown.  Sorry if that's tough to follow, but the action should largely speak for itself!


Steven's Gepanzerte Panzergrenadiers
  • HQ + Panzerschreck
  • Full Gepanzerte
  • Full Gepanzerte
  • 10/5 Armored AA
  • 4x Panzer IV H
  • 3x Pumas
  • 3x Stug III G
  • Limited HS129Bs
Jon's British Paratroopers
  • HQ + Frost + 3 PIATs
  • Full Para Platoon
  • Full Para Platoon
  • Glider Pilots
  • Assault Platoon (3 stands w/ flame thrower)
  • 6 Pounders
  • 75mm Pack Howitzers + Corps Artillery
  • Mortars
  • HMGs

I put my Stugs and AAA in reserve. Panzergrenadiers and Panzers crowd the congested terrain.


Read More

Thursday, March 22, 2012

Army Spotlight: Soviet Forward Detachment

I'm a big fan of the Soviet Forward Detachment in Red Bear.  I always like being the attacker in Flames of War, and I like that this list minimizes the difficulty of getting the most out of your combat platoons.  Plus, the list is so flexible, you can make a boat load of combinations that all play totally differently!

With that in mind, I am going to approach this article a little differently- rather than build one list, I am going to build three and talk about the pros and cons of each.  Because this list is so flexible, this is highly opinion-based!  So sound off in the comments and let us know what Forward Detachment has worked for you, or what you'd like to give a shot!

All images of the army lists are generated from Easy Army.  If you haven't tried it yet- change that RIGHT NOW!  We'll still be here when you get back... in a few hours.

LIST ONE: FOR THE SWARM


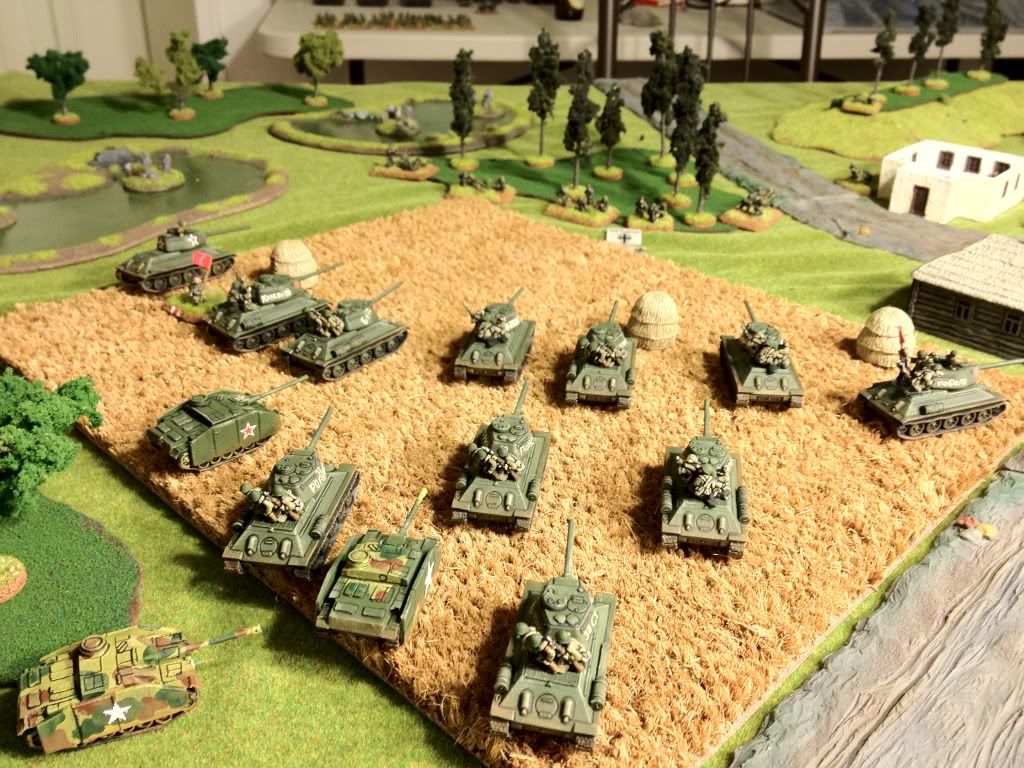
This list is meant to strike hard and fast.  21 tanks with an infiltration-capable recon unit, auto attack.  I've loaded up with 11 T-34/85s to deal with enemy armor, and 10 cheapo T-34s for exploitation/infantry assaults.  This list would be strong in any half-on engagement since the two beefy tank units would allow you to front load 1300 points or so.  Versus enemy armor, all of your eggs are in one basket.  Lose those 11 T-34/85s and you are in for a world of hurt!  The idea is you overwhelm your enemy fast, and push them off an objective early.  Buying tank riders for your standard T-34 company would be a solid buy as well- you'd need to drop all of the cupola upgrades, both HMGs in the motorstrelk, and both Komissars.

LIST TWO: PURPOSEFUL ASSAULT
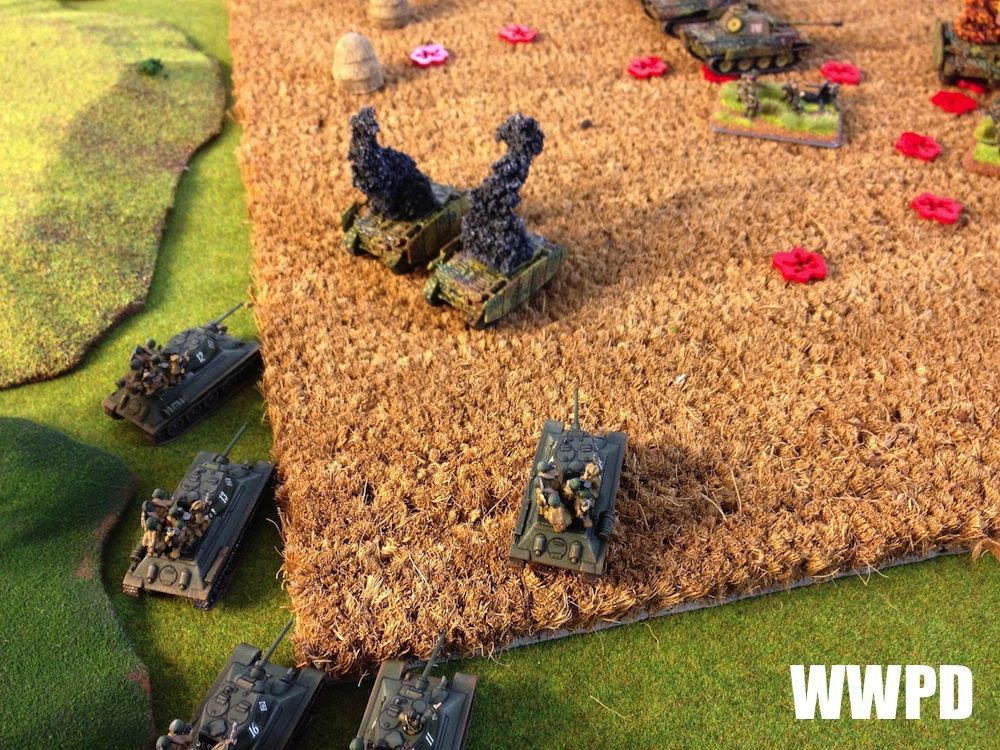
This iteration of the list is far more plodding.  This would be more of an ideal choice for assaulting a fortified company.  The assault guns can clear bunkers and buildings, your infantry can clear fortifications and your tanks can breakthrough when the opportunity presents itself!  I ran a very similar list to this in an almost ideal situation.  I had no idea I'd be facing fortifications, but we rolled off and got "The Big Push".  The list performed well.

Where this list lacks in speed compared to the first one, it makes up in firepower.  Decoy Panthers have yet to truly impress me, but their price is right and I've seen them used to great effect.


LIST THREE: THE KITCHEN SINK
This is probably my least favorite of the lists, but it is flexible.  As usual, when you make a Jack of all trades list you are a master of none.  This is a bit light on the anti tank, but against an infantry heavy force I think it could really shine.  But it does a good job of illustrating just how drastically you can change the nature of the force.

Emchas- I've been sold on the usefulness of the Emchas 76s recently, and think a Forward Detachment is a great fit for them.  Unfortunately, I don't have any Soviet shermans yet so I can't speak to them personally.  For +5 points/tank to gain protected ammo, you effectively ignore 1/3 of all incoming shots from Panthers and Tigers when you're fearless with re-rolls to remount!  I'll have to give them a shot.

I really like the Forward Detachment for its flexibility.  I've used it quite a bit and plan to revisit it in our Firestorm Campaign game once we fire up Turn 2.
Read More

Wednesday, March 21, 2012

WoT Map Analysis: Komarin

Each map in World of Tanks has some optimal places for tanks to go. No strategy is perfect and often times player skill rules, but a good strategy followed by a platoon can often times swing things in your favor. This series will hopefully lay out some ground work and give ideas on how best to tackle a map by analyzing the standard game play for each map.
A unique map in that the teams do not start near the flags, Komarin offers multiple tactical options. The teams start in the north and south, divided by rivers offering three routes. The center route is a large, elevated, and wooded island connected by bridge to the south, and offers firing positions to nearly the entire map, but at the cost of being exposed if spotted. Recently Czech hedgehogs (tank stopping iron obstacles) have be added, these need a heavy tank to hit them at speed or HE shells to crush them. A small village on both the west and east side of the map offer attackers valuable cover en route to the flag, but leave any tank passing the village exposed to covered and concealed defenders once they leave the village.


Komarin is unique from most other maps in the sense that teams do not split foraces to take on flanks or routes, instead they split into offensive forces and defensive forces. Knowing the proper balance and which tanks fit the roles better will make or break your stand on this map, too weak of a defense and a quick-cap will end the game, while an over powered defense will lead to being flanked through your own capture zone. If nothing else, knowing a proper division of forces and changing your plan to fit the needs of the team will change the odds of success dramatically.


Focusing first on the defense, primarily suited for heavies, especially the US heavies with their thick turrets, and the occasional TD; areas in the north and south grant excellent cover as well as hull down positions. In the north, the red lines, areas just behind the road and before the bridge offer excellent cover as well as perfect sight lines into the defensive capture zone and beyond. Typical views can reach on top of the hill overlooking the island as well as to the white buildings before the capture zone. To the south, the blue lines, again areas behind the road and just beyond the bridge behind the shrubs provide excellent concealment while given sight lines into the village boarding the defensive capture zone. Both of these positions can be defended fairly effectively by about a quarter of the forces, particularly if they consist of heavies with excellent turret armor and decent gun depression.


On the offensive side of the battlefield, advancing into the villages and buildings outside of the capture zones will be your game plan. The north end advancing south will be able to navigate the building in the village and the hill to provide protection from the center island. To the south, advancing into the white buildings and the hill will allow sight lines into the center island and offering more protecting that the hill for the northern side. Both sides, once established, will have to duke it out against the defenders or swarm them in order to secure the capture zone. TDs will work wonders as snipers while mediums move up and take ground from the supporting fire, SPGs will provide additional support to soften up the defenders and allow for a capture to occur.


The final section is often regarded as more of a death trap, and takes a heavy tank to access. The island can provide fire support to any area of the map and does offer decent cover, but being in the center of the map, anything and everything can return fire or catch you trying to cross the bridges. Use of the center island should be taken carefully and used sparingly, a major push through here will often result in a bottle neck, but if done properly, this can provide a quick route to attack the rear of forces or sweep into the deployment zone and over run SPGs. The SPGs are advised to use the wooded areas marked by the triangles for the base of operation. These areas offer complete concealment and access to hit defenders with easy and attackers with a bit of skill. SPGs here can make all the difference as they can quickly dispatch the defenders, allowing for a successful capture, as well as slow down any assaulting force.

Effectively plan around this analysis, use the route to your advantage to best take on what tanks to expect in each area, and always support where areas are lightly defended but be ready to reenforce as needed. With a good platoon at your side, and now knowing this map better, a skilled team can hold out against the tides of enemy armor while their own wave sweeps over for a crushing victory.
Read More

WoT Map Analysis: Komarin

Each map in World of Tanks has some optimal places for tanks to go. No strategy is perfect and often times player skill rules, but a good strategy followed by a platoon can often times swing things in your favor. This series will hopefully lay out some ground work and give ideas on how best to tackle a map by analyzing the standard game play for each map.
A unique map in that the teams do not start near the flags, Komarin offers multiple tactical options. The teams start in the north and south, divided by rivers offering three routes. The center route is a large, elevated, and wooded island connected by bridge to the south, and offers firing positions to nearly the entire map, but at the cost of being exposed if spotted. Recently Czech hedgehogs (tank stopping iron obstacles) have be added, these need a heavy tank to hit them at speed or HE shells to crush them. A small village on both the west and east side of the map offer attackers valuable cover en route to the flag, but leave any tank passing the village exposed to covered and concealed defenders once they leave the village.


Read More

Tuesday, March 20, 2012

Firestorm Turn One Recap


Sean and I finished up our Firestorm Campaign's Turn One, but before we begin turn 2 we decided to recap the action.

Read More

Monday, March 19, 2012

Battlefront's DFS-230 Gliders


By Max.
Battlefront's new DFS-230 Assault Glider!!  Yea baby!!  For uber-Fallschirm nut jobs like me and Brian this is just a great treat.  My dreams of storming Hill 107 with Major Koch and his 15 glider mounted company of the elite Sturm regiment might come true yet!! 

History
The DFS-230 was first produced in 1940.  It was made of tubular steel, with canvas covering and wooden wings.  It had a crew of one (pilot) and could carry up to 10 troops or 1,200 kg of equipment.  It was employed as an assault glider.  It was usually towed behind a JU-52 or an HE-111.  Standard armament was one MG-15 or MG-34 light machinegun.
*- Information from Wikipedia and Fallschirmjager.net


 The Model:

The Battlefront DFS-230 gliders are a great little kit.  These guys are BFs first foray into the all plastic arena.  The kit is well detailed with nice crisp panel lines.  At first the scale seemed a bit off but after looking at some original pictures of the real thing you can tell the crew and troops inside were very cramped.  The box set comes with 4 gliders, 4 gunners and a decal sheet.  No instruction sheet was supplied but the kit is very easy to build just by using the box art.  Decals are very nice, typical of BF's quality.  The gunners are well cast as well.

Assembly:

As stated above, each of the 4 gliders comes in its own sprue.  There are only 5 parts (not including gunner) to the kit.  The main fuselage, wing, horizontal stabilizers (had to look that up!), and two support struts.  The kits were put together using regular model glue.  I recommend that this type of glue be used over CA glue.  Assembly was straight forward with no issues other than a few molding marks that needed a little love on the main fuselage.


Painting:

This is where I ran into trouble.  Not because of anything to do with the kit but just my own skill.  Like the earlier M-3 Stuarts I painted I decided to mask off to get clean lines.  I don't know what happened but I essentially had to paint these guys twice.  The base color I used was Vallejo 823 (Luft. Camo Green).  The under color is Vallejo 989 (Sky Grey).  The camo green is Vallejo 896 (Extra Dark Green).  Windows were painted Vallejo 962 (Flat Blue).  The base coat was applied with an airbrush, masked off, and then the Vallejo 989 was sprayed.

Decals were applied and then the kits were given a 4:1:1 wash and set to dry.  The gliders were then dry brushed with two successive light coats of the base colors then given a coat of flat varnish.


I really like the kits and look forward to putting together 8 or 10 more for my FJ pioneers to assault Crete or Eben Emael!!

5 out of 5 Panzerfausts!!
Read More

Sunday, March 18, 2012

Wargaming Shirts!

"hetzers gonna hetz" has sold more than any other!
As most of you who listen to our Podcast know, I've worked closely with our good friend Arran from Mad Idol to roll out an ever expanding line of Wargaming T-Shirts called, appropriately enough, Wargaming Shirts.

The shirts are high quality, and made to order- thus you can pick a design you like, get it on any color shirt, and whatever size you need!  I was skeptical of the print quality, but have so far been nothing but impressed.

WWPD Max!
Currently the line focuses mostly on WWII/Flames of War specific subjects, but will be expanding them as we go.  We are always looking for suggestions for new designs!

Thanks to everyone who has bought a shirt so far- everyone seems to be happy with their purchases!  So go show the world how much of a nerd you are and pick one out!


If you buy a shirt and take a picture, we'll put it up on the web and you can live in infamy!  Although I don't think any of us can compete with the Snorg Tees ladies...

And here's a bunch of designs I am rather fond of.  We have plenty more to choose from in a bunch of different categories!


Read More

Popular Posts In the last 30 Days

Copyright 2009-2012 WWPD LLC. Graphics and webdesign by Arran Slee-Smith. Original Template Designed by Magpress.