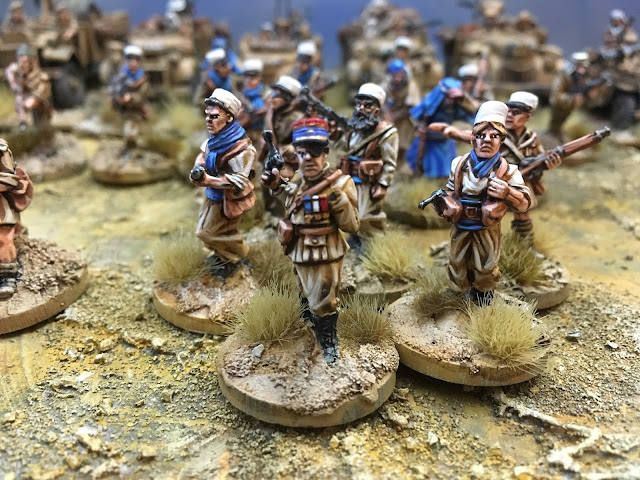
The miniatures I have used are all from the Artizan or Thrilling Tales range which can be found at Northstar Games (in Australia War & Peace Games stock them). I personally find these miniatures fantastic to paint as they are full of character and are generally of excellent quality. They are also metal which I prefer. I also find that not many others have dedicated LRDG or French Foreign Legion ranges, so it was not a difficult choice to go with them. The LRDG range is limited so I supplemented them with French Foreign Legion troops which adds some great variety to the force, both in the painting and storytelling aspects.
To start with each miniature is glued to a base and some spakfilla placed around to build it up, this hides the metal joining the miniatures feet as well as create an uneven surface. Once the spakfilla has settled I put some pva glue down and sprinkle some small rocks and sand to create even more depth to the base. This step really helps to tell the story of the miniature and join a force together so it is worth putting in a bit of extra effort at this stage, rather than paint the miniature first and try and do the base later.
I use Army Painter primer spray cans to prime the miniatures and it is always a black first, followed by a white. The black does all the hard work in actually priming and the white is a light spray over the top to help see the details and also make the lighter colours that we add later more vibrant. With this method I end up with some colour modulation starting at light at the head and darker at the feet once base colours have been added.
With these miniatures, I used a layering technique to build the depth with the colours starting from darkest to lightest. The process is basically base - wash - base - highlight one - highlight two - highlight three - 'blackline'. I will give the example of the sand colour I have used for the bulk of the force. All paints are Vallejo (Valley-jo for Casey) and I start with Desert Yellow 70.977 as the base colour followed by a sepia wash and once dry, the Desert Yellow again but leaving the recesses dark where the wash has settled. Highlight one is Tan Yellow 70.912 and this highlight is a broad one where only small amounts of the original base colour will still show at the edges. Highlight two is Iraqi Sand 70.819 and now the highlights are getting much more narrow and concentrating on extremities. Highlight three is Bonewhite 72.034 and this is just for the extreme points such as edge of cuffs, elbows and corner of pockets.
The final touch is the 'blackline' and for this I use a Sepia ink 72.09. Using a fine detail brush I paint this carefully into the recesses where the clothing meets other parts and pockets. This is a really important step as it helps to define focus points and segregate different components of your miniature.
For the flesh I have used Dwarf Flesh 72.041 as the base and followed the same layering principle of base - wash - base - highlight one - highlight two - highlight three - 'blackline'. This time though I keep it simple by mixing dwarf flesh with off white 72.101 to create the variation for the different highlights. When mixing each highlight it should not be extreme between each layer, and try to make it a smooth transition, as there are not as many hard edges with the flesh. I also use an army painter strong tone ink for the wash. For the eyes I use a black ink and paint small areas around where the eyes would be and follow this up with two small dots of off white to create the eyes themselves.
The darker colour used on overcoats and some pants use English Uniform as a base, then transitions up to Khaki and the white starts of as Iraqi Sand and transitions through Bonewhite onto an Off White. The blue is Ultramarine Blue 72.022 and transitions up to Electric Blue 72.023. For the bases I use the Desert Yellow and then a Sepia wash, this is followed by a dry brush of the Tan Yellow and a final dry brush with Bonewhite.
It is difficult when painting a force like the LRDG to create real contrast with your colours and get your army to pop. The white shemaghs went some way to doing this but with the introduction of the French Foreign Legion I was able to branch out and throw some more white and some bright blues around. I am sure this is not historically accurate but I think we, as gamers, can walk a fine line between accuracy and artistic license to create an interesting force. I hope this was of some use for you and don't forget I have kept an album of photos on the Bolt Action Alliance Facebook page which shows the project from start to finish.
I will be stepping out at MOAB 2016 in October and will be using the LRDG for a 2 day 1250 point event. I am immensely looking forward to this as the last hurrah for the V1 ruleset and you can be guaranteed that I will do up an After Action Report (AAR) post event to let you know how they went!
Patch


