


By Dennis,

Today I'll be walking you through a step by step guide on how to make an iconic WW2 building from the Pacific Theater, the Quonset Hut in 28mm scale.

Today I'll be walking you through a step by step guide on how to make an iconic WW2 building from the Pacific Theater, the Quonset Hut in 28mm scale.

Quonset huts were manufactured from 1941, when the United States Navy needed an all-purpose, lightweight building that could be shipped anywhere and assembled without skilled labor.

Hundreds of thousands were produced during World War II with many variations. The most common design was a 20 ft × 48 ft (6 m × 15 m) structure framed with steel members with an 10 ft (3 m) radius. The sides were corrugated steel sheets.
The two ends were covered with plywood, which had doors and windows. The interior was insulated and had pressed wood lining and a wood floor. The building could be placed on concrete, on pilings, or directly on the ground with a wood floor.

You will need the following:
90mm diameter poster tube
3mm MDF
Fine sand
Coffee stirrers
Corrugated cardboard (small)
Mounting card
Thin balsa sheet
Tools:
Utility knife and hobby knife
Super glue (gel)
Liquid Nails (builders adhesive)
Vermin wire (6-8mm squares)
Long nose pliers and side cutters
Small file and Sand paper
Jigsaw/Belt Sander (optional)
Making the hut
On to the project, taking the standard size of a real quonset hut and reducing it to 1/56 gives you a building footprint of 90mm wide by 180mm long.
To better scale it to the battlefield I reduced the overall length to 160mm, so our first step is to take your 90mm poster tube and cut a length at 160mm long.

The shorter length of tube is easier to cut in half, this will become the frame for the completed building.

Using the mounting card, trace two semi-circles to suit the inside of the half tube. This will become the plywood ends of the hut.
Find the center of the mounting card and cut out the door, 30mm x 22mm.
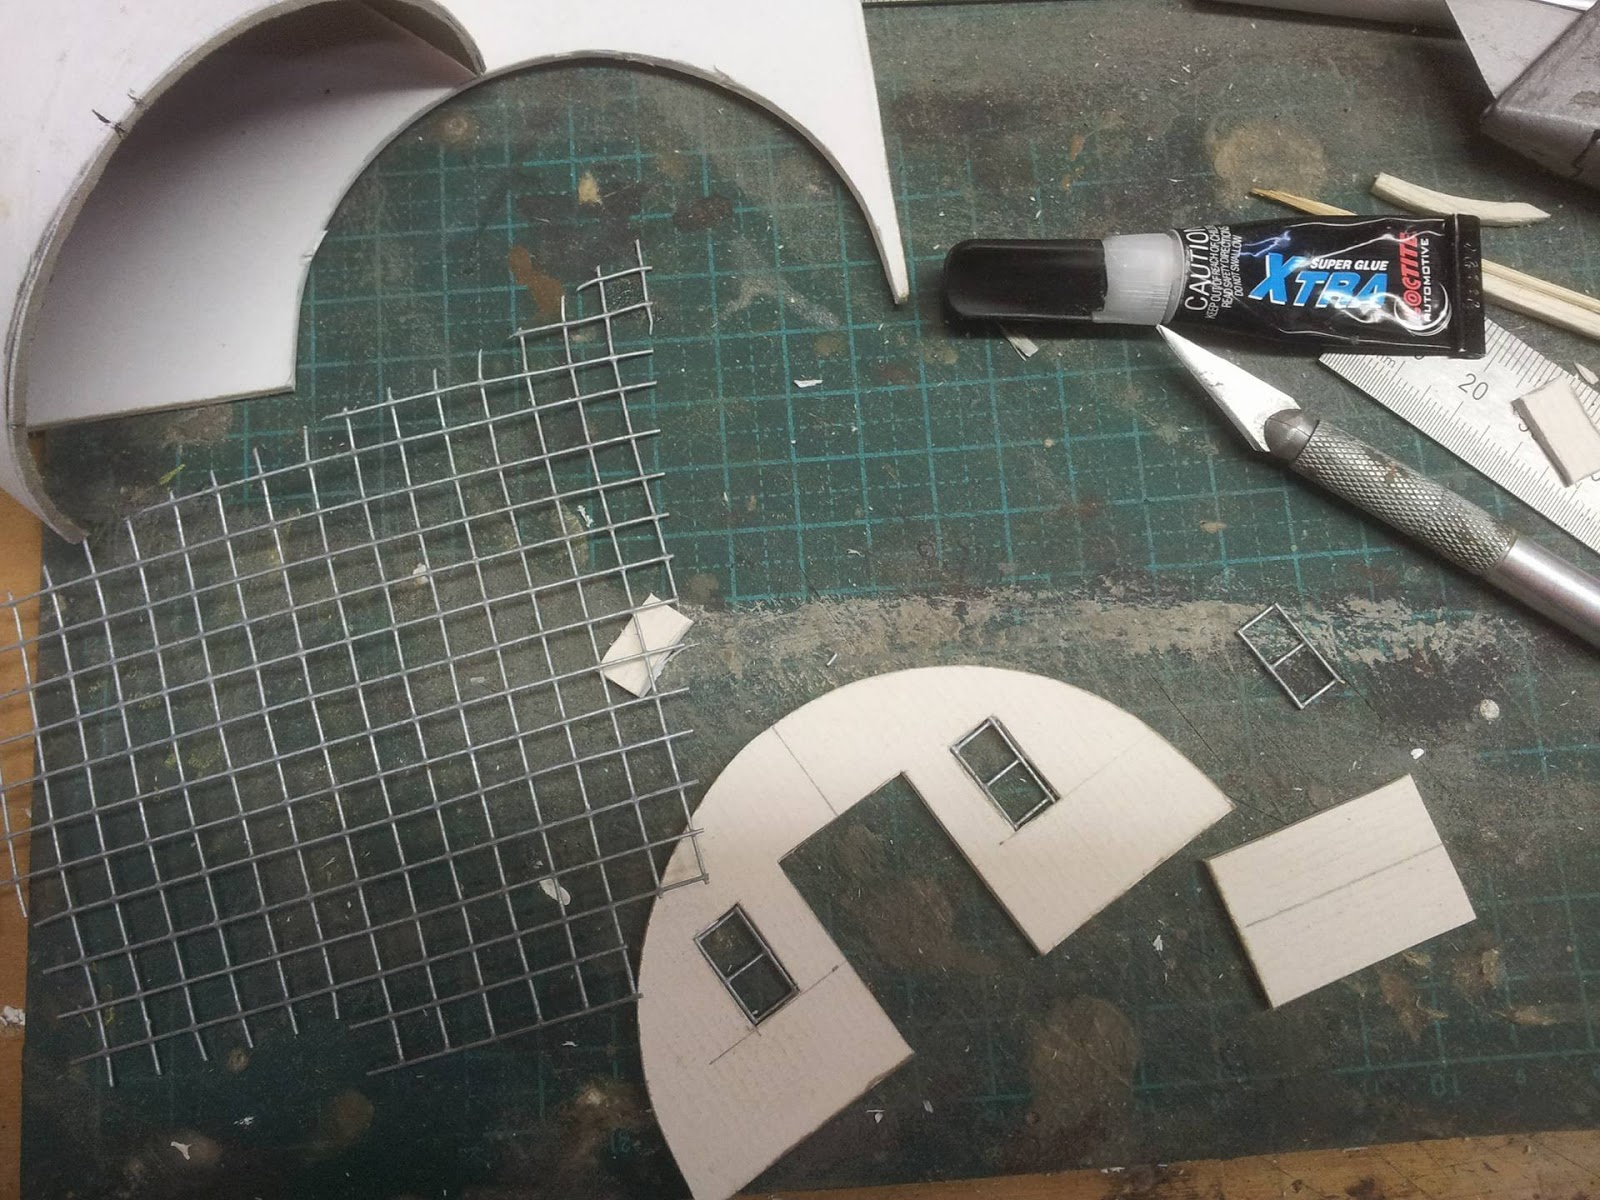
Take the vermin wire and cut down two window frames (2x1 square) for the front and a larger one (2x2 square) for the rear. Clip down/file/sand down to give them cleaner edges.
Now trace them onto the mounting card with the bottom of the frame 15mm from the ground and 8mm from the door frame, take you time cutting through the card taking several cuts.

Similar with the rear mounting card panel, find the center then trace and cut a window, the bottom of the window is 15mm from the ground.
Super glue the windows in place using tweezers or pliers.

Next step is the corrugated iron, cut two pieces at 160mm x 50mm and one at 160mm x 70mm.
The roll I'm using was brought at a craft store that carried a lot of scrap booking gear, it's approx. 3mm corrugation on the ridges. you could use larger but smaller stuff will look better for scale.

So the corrugated card meets with the curvature of the postage tube better, I rolled it around a smaller piece of tubing I had on hand.

Apply a thin layer of Liquid Nails (or PVA) to the postage tube, line up the card on the sides and peg in place to dry.

Whilst the tube section drys you can cut out the door. Take your balsa wood and cutout a rough rectangle about 30mm x 40mm, this doesn't need to be accurate, the overlap will be stuck behind the door frame when glued to the card.
Score the wood to give the impression of panels with your hobby knife.

Glue and peg the top section of corrugated card on top, while it drys you can cut out the wire side windows, you'll need six 2x2 square frames.

Mark out the side windows and trace around the wire the same as earlier, each window center wire is at 40mm intervals and the bottom is 15mm from the ground.
I found the tube moved a lot when I tried to cut the first window, to fix this I glued the front and rear ends in to give the tube better rigidity. Both sections were super glued in place, the rear flush with the end of the tube first.
For the front mark out a 10mm lip inside the tube and glue the front section in place. The lip will become the overhang.

With both the front and rear pieces glued in place, cut out the remaining window frames. Take your cut wire windows and press them on a spare section of tube so they meet the curvature of your hut easily, glue in place with super glue.

Now you can start adding the small details, using the coffee stirrers cut small strips to make an outer door frame and grab a pin to use as a door knob. Cut down the pin to a short length with the pliers. Super glue them in place.

Now cut down more coffee stirrer pieces. You'll need 7 around 10mm x 4mm for the overhang and 2 about 30mm x 4mm for the section near the ground. The stirrers are easy to cut down with garden secateurs and these pieces don't need to be a snug fit.
Also cut out a outer window frame for the front and rear windows from cereal box card, glue all pieces in place with super glue.
Also cut out a outer window frame for the front and rear windows from cereal box card, glue all pieces in place with super glue.

That's the primary hut completed, onto the base!

Using 3mm MDF mark out a rough base for your hut and cut it out with a jigsaw if you have one, I use a fine tooth blade in mine so it doesn't tear the MDF as much. A coping saw can also be used.

Next step was smoothing out the edge of the base, I used a belt sander. You can do this by hand it just takes a while. Be sure to use a mask when sanding MDF.

With most the work done by the belt sander I tided up the the edges with a speed sander, you get a lot better control using one of these.


Onto the base details, take some water based Liquid Nails and dispense it into a air tight container, even a takeaway container will do. Now add some water and mix with a old brush and continue to add water until you get a PVA like consistency.
Brush the mix on the on the base, a dabbing motion will eliminate any excessive brush marks and cover with sand.
Brush the mix on the on the base, a dabbing motion will eliminate any excessive brush marks and cover with sand.

When dry trace around the outside of your hut and mark where the entrance is. Using coffee stirrers add planking to the entrance.
In the above photo I have marked out a rough section in red using 'paint', this is a extra option.
Cut a hole in the MDF about 10mm smaller then the huts footprint, this will make the building accessible to your troops! Simply lift and place under!
In the above photo I have marked out a rough section in red using 'paint', this is a extra option.
Cut a hole in the MDF about 10mm smaller then the huts footprint, this will make the building accessible to your troops! Simply lift and place under!

Now to attach the hut to the base use straight Liquid Nails form the dispenser and run a small bead of glue around edge where the hut will sit on the base.
Clean up an extra using an old brush or cotton tip and sprinkle some sand on any remaining visible glue.
Leave to dry overnight, from here you only need to paint and detail.
Painting the Hut

The whole Hut and base was undercoated with mission brown, all ground areas were dry brushed up using a sand colour. The corrugated sheet was painted with a low gloss grey and dry brushed with a light grey before adding weathering. The timber ends where dry brushed lightly in the sand then the light grey to make the details pop.
Finally flock, grass tufts and a few cut down aquarium plants were added to complete the project.
If the plastic aquarium plants look a bit shiny, wash them in warm soapy water before gluing them down, I then give them a coat of Army Painter brush on matt varnish.

And that's the project complete - Dennis
*UPDATED* It has been brought to my attention that 90mm postage tubes are quite difficult to get in the UK, not to worry 102mm ones can be used with good results!
Below is a shot of an earlier hut made for a airfield themed board, this one used 110mm PVC down pipe. You can use this as well but its a lot harder to work with, good option if you're stuck.
You could also try getting the tubes from a carpet/blind or cloth material supplier as they usually come on cardboard tube rolls.
You could even use smaller tubes to make Anderson shelters for a Sea Lion themed table!


