Deep in the heart of Nazi Germany an ancient power stirs. The destruction, suffering, and death caused by the War breathes life into the Great Old One. An unholy alliance has been formed between this ancient evil and Nazi corruption of man. One provides the souls to be sacrificed, the other a champion to answer the call. Arise Cthullu Commander. (What can we say? Sometimes you've got to go a little crazy in your BA games. Enjoy the fun AARticle and your Labor Day! - Judson)
Sunday, August 31, 2014
Bolt Action - AAR: The Rise of Cthullu Commander
Deep in the heart of Nazi Germany an ancient power stirs. The destruction, suffering, and death caused by the War breathes life into the Great Old One. An unholy alliance has been formed between this ancient evil and Nazi corruption of man. One provides the souls to be sacrificed, the other a champion to answer the call. Arise Cthullu Commander. (What can we say? Sometimes you've got to go a little crazy in your BA games. Enjoy the fun AARticle and your Labor Day! - Judson)
Friday, August 29, 2014
Boltaction.net Weekend Review
Posted by
Steven
Did you miss a daily article this week? If so make sure you go back and check them out.
Review: Blitzkrieg Miniatures M3 Stuart
Cbax took a look at this beautiful Tank from Blitzkrieg Miniatures.
Tuesday:
The Liberation of Paris
On August 25, 1944, the German garrison stationed in Paris surrendered to the Free French and American 3rd Army, under Gen. Patton. Paris, which had been occupied since June 30, 1940 was no longer under Nazi control. While large portions of the rest of france remained in German control, the Liberation of Paris was a monumental occassion that was preceeded by union strikes and an upraising by the Frnach Resistance. Between August 19th and Augst 24th the Free French of the Interior (FFI) rose up and began fighting with the German garrison. As many as 1,000 resistnace fighters where killed and another 1,500 wounded before the German surrender on the 25th. Thousands of PArisians poured into the street as they welcomes the 2nd Frnech Armored Division into the Capital.
Make sure you join us next week for more exciting articles and Bolt Action news.
Cbax took a look at this beautiful Tank from Blitzkrieg Miniatures.
Tuesday:
Wednesday:
Radio Networks in Tank War
Judson gave us a run down of the new rules for radio networks in TANK WAR!
Thursday:
Anferene kicks off his Tanko Thursday series of articles looking at some of the lesser know tank aces of war.
Friday:
BAR Episode 27 The crew get their panzer on in this very tanky episode of Bolt Action Radio.
This Week in World War Two History:
The Liberation of Paris
On August 25, 1944, the German garrison stationed in Paris surrendered to the Free French and American 3rd Army, under Gen. Patton. Paris, which had been occupied since June 30, 1940 was no longer under Nazi control. While large portions of the rest of france remained in German control, the Liberation of Paris was a monumental occassion that was preceeded by union strikes and an upraising by the Frnach Resistance. Between August 19th and Augst 24th the Free French of the Interior (FFI) rose up and began fighting with the German garrison. As many as 1,000 resistnace fighters where killed and another 1,500 wounded before the German surrender on the 25th. Thousands of PArisians poured into the street as they welcomes the 2nd Frnech Armored Division into the Capital.
Make sure you join us next week for more exciting articles and Bolt Action news.
Spotlight: Sherman Crocodiles (US060)
I am slowly building out my American forces for Flames of War and decided to add in the Sherman Crocodile. While this is a very specific tank that cannot be used in a ton of lists, it does fit right in with my 29th Infantry Division theme for my US Infantry. Why the Croc? Well, at 280 points for Confident Trained tanks, I think there is some significant value in this unit. Steven and I are particularly fascinated with units that have significant drawbacks that push their points down, but allow for some really good advantages when played properly.
Advantages
- The Flamethrower - This tank has a flamethrower and a trailer, which mitigates the major drawbacks of having a flame tank - it explodes easily (re-roll FP against). At ROF 5 with a 6" range, this platoon is deadly against infantry and gun teams.
- It's a Sherman - Even though the flamethrower is the focus, this is still a Sherman tank with a full compliment of guns. This includes the .50 cal AA MG, Hull MG and more importantly the M3 75mm gun with Stabilizer and Smoke.
Judge Dredd - The Helmet
This is part of the Judge Dredd series of posts. See the Main Article for more information.
If you decide to buy one like me, I suggest you poke around and figure out what will be right for you. Some are larger than others, some are more accurate, etc. Whatever you decide to do, make sure you get one from a reputable vendor - again, see the Facebook Group. If you go for a cheap lid on eBay, you could be buying a re-cast or getting a helmet that is just not right for you. I am a pretty big dude, so I was worried about fit. I found my helmet from Mr. Pinsky's Props. For me, this offered the best combo of price, size, availability and accuracy.
There is some significant trimming and sanding required to get the helmet ready for primer and paint. I would recommend some sort of power sander - your arm will fall off otherwise. I went ahead and added some damage to my helmet at this stage as well. I painted the whole thing with a couple of coats of grey primer before doing a few layers of aluminum paint. If I had to do it again, I would do a couple of more layers of the aluminum. The thinking is that if I get a chip, it should be metal underneath. Also, I can just sand off a little paint to reveal the aluminum below. This worked ok, but I did end up going back with a silver sharpie on a couple of spots.
Anyway, I did a couple of coats of Satin Black and let that dry overnight. I like the satin paint because is has a very slight shine and is also tougher than flat black. I am very happy with the way it turned out. I then masked that off an did the Rust-Oleum Colonial Red.
After getting this done, I went back with the Goldfinger and just rubbed it on to the badge. I think this looks great!
For the visor, I used the recommended Hobart 770580 Face Shield Replacement Lens, Shaded. I just cut the thing to size with some tin scissors. Make sure you use the templates from the Studio Creations site for your lining. I used some foam floor mat for the liner and covered it with a spray of plastidip. Use velcro to attach the visor and all lining parts so they can be removed for cleaning and upgrades.
Read More
The Build - Helmet
I did a ton of research on creating a lid and on buying one. Very quickly, I dismissed making one. Unless I was flat broke, I could never see making one myself, as it is very labor intensive and full of 'Nope' for me.If you decide to buy one like me, I suggest you poke around and figure out what will be right for you. Some are larger than others, some are more accurate, etc. Whatever you decide to do, make sure you get one from a reputable vendor - again, see the Facebook Group. If you go for a cheap lid on eBay, you could be buying a re-cast or getting a helmet that is just not right for you. I am a pretty big dude, so I was worried about fit. I found my helmet from Mr. Pinsky's Props. For me, this offered the best combo of price, size, availability and accuracy.
There is some significant trimming and sanding required to get the helmet ready for primer and paint. I would recommend some sort of power sander - your arm will fall off otherwise. I went ahead and added some damage to my helmet at this stage as well. I painted the whole thing with a couple of coats of grey primer before doing a few layers of aluminum paint. If I had to do it again, I would do a couple of more layers of the aluminum. The thinking is that if I get a chip, it should be metal underneath. Also, I can just sand off a little paint to reveal the aluminum below. This worked ok, but I did end up going back with a silver sharpie on a couple of spots.
Anyway, I did a couple of coats of Satin Black and let that dry overnight. I like the satin paint because is has a very slight shine and is also tougher than flat black. I am very happy with the way it turned out. I then masked that off an did the Rust-Oleum Colonial Red.
After getting this done, I went back with the Goldfinger and just rubbed it on to the badge. I think this looks great!
For the visor, I used the recommended Hobart 770580 Face Shield Replacement Lens, Shaded. I just cut the thing to size with some tin scissors. Make sure you use the templates from the Studio Creations site for your lining. I used some foam floor mat for the liner and covered it with a spray of plastidip. Use velcro to attach the visor and all lining parts so they can be removed for cleaning and upgrades.
The finished Lid. |
Judge Dredd - The Belt
Updated March 19th, 2014
This is part of the Judge Dredd series of posts. See the Main Article for more information.
Read More
This is part of the Judge Dredd series of posts. See the Main Article for more information.
The Build - The Belt
People are doing a lot of different things for the belt and buckle. I decided to go ahead and order a buckle with my badge from Sean Cho (rattlehead1 [AT] msn [DOT]com) on the Facebook Group. His buckle is very accurate and very well made. I used a little wash on it and it was ready to go. I found a great Dickie's belt that allowed me to attach the buckle on a flat surface with just a piece of Velcro. This was one of the easiest parts of the build.
For the accessories, I decided not to make much. I ordered the leather from Dave's Leathers (dferrickleather [AT] yahoo [DOT] com) for about $160. I ordered mines and grenades and such from vendors listed in the Facebook Group file.
For the magazines, you can use Tactical Magazine Pouch, which is pretty close to the screen-used.
Patterns - Update 11/13/2014
In helping a friend with her build, she found these great patterns for the belt accessories. These templates were created by Steve Mack on the JUDGE DREDD Costume Group on Facebook. Thanks, Steve!
Door Mine Pouch
Stun Grenade Pouch
Med Pouch
Med Pouch/Grenade Holder
I made the Med Pouch out of 1/4" EVA Foam and it worked great. I did use some thin Kydex to reinforce the inside of the back wall and the sides for strength. For the cross, I just cut one out of 3mm foam and glued it on - I was pressed for time.
--- end update
Cuffs - Update 9/3/2014
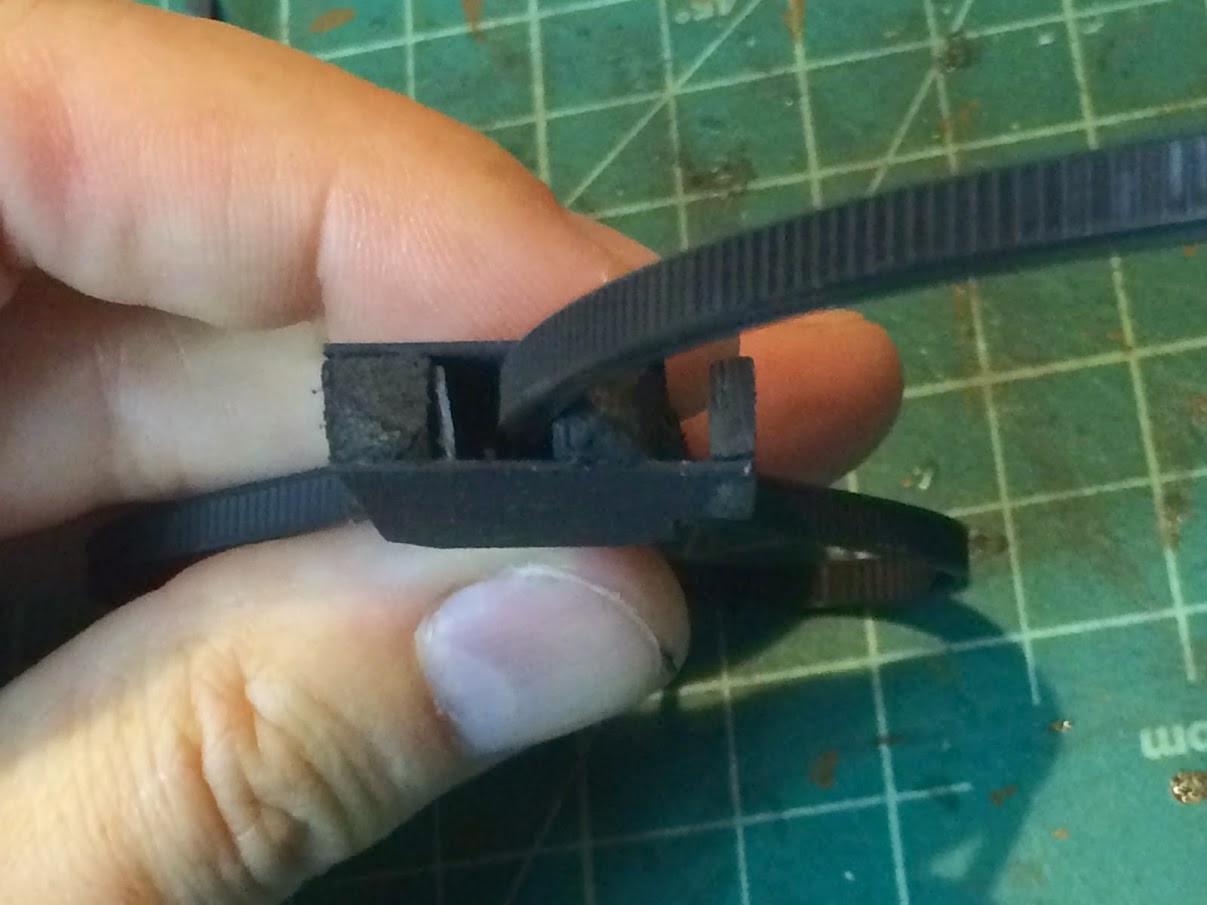
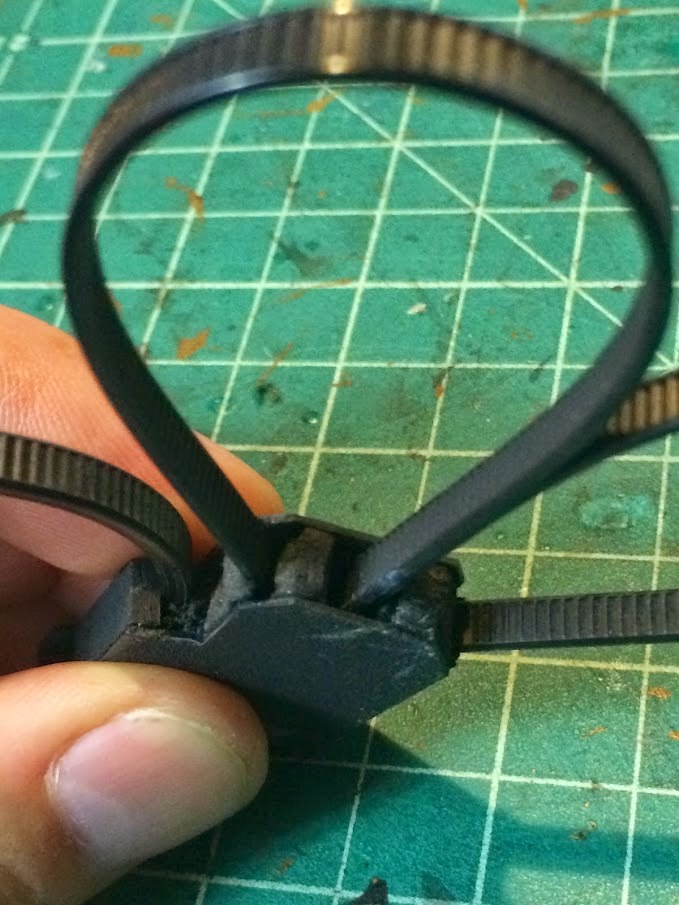
For my recent event, I had no cuffs at all, so I decided to make some not very screen accurate ones just to have something on the belt. Again, thanks to Studio Creations, there is a build sheet for the cuffs. I simply used some of my spare .028" Kydex to fashion the top and the bottom pieces. I then cut strips of the kydex that were a little thicker than the zip ties I had to make a channel down the center of the plates. I glued those in, making sure to leave enough room to two zip ties. Next, I took 4 layers of kydex and made the outside piece where the two ties are held in place. For the last bit, I just glued in some 1/4" craft foam to fill out the thickness. After that, I hacked up the foam to fit and the ends of the zip ties and glued them in. I wrapped the zip ties in place and glued them together at the ends. Next, glued the top on and call it a day.
Screen accurate? Absolutely not - these are not long enough or thick enough to match the screen. Cost? Probably $.25 and they are better than nothing. I could have probably done something with the ends, but I was in a big hurry and I can always chop them off and make them better later.
Flash Bang Grenades Update - 9/5/2014
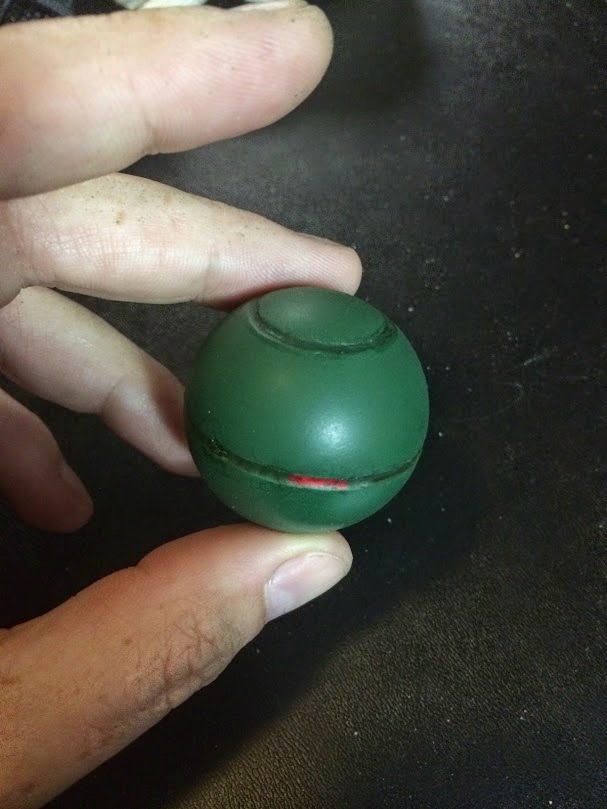
Originally, I just had nothing in my flash bang pouch. This was fine, but I cannot keep the build static, so I got busy building some grenades! Apparently, the ones used in the movie were 1.75", which is a little larger than a ping-pong ball (40mm). I figured that these would be close enough! I looked into ordering these, but found you can really only buy a bunch. This took me to my local sporting good store where I got 6 balls for about $4.
Hold your ping-pong ball up to a light and note the natural line running right around the middle of the ball. This is where the two halves join. Use your sharpie to trace this so you can see it.
Next, use the tip pictured above in your rotary tool to slowly and carefully grind away at the line your just drew.
Use sandpaper to clean this up
To trace a line for the switch, I used the inside of a roll of electrical tape. I held this tight to the ball and just traced a line with my trusty sharpie.
I used the same technique as above to grind out the switch. Be very careful on this part, as the material is only half as thick as the middle part.
I used some thin wire to secure the ball and paint it. When this was dry, I used a brush to fill in the area around the middle and paint in a red indicator. Then, I used some black wash to darken the depressions. Last, I sealed the ball with a matte spray.
Screen accurate? Nope. Cheap and looks good on the belt? Yep!
--- end update
For the magazines, you can use Tactical Magazine Pouch, which is pretty close to the screen-used.
Patterns - Update 11/13/2014
In helping a friend with her build, she found these great patterns for the belt accessories. These templates were created by Steve Mack on the JUDGE DREDD Costume Group on Facebook. Thanks, Steve!
Door Mine Pouch
Stun Grenade Pouch
Med Pouch
Med Pouch/Grenade Holder
I made the Med Pouch out of 1/4" EVA Foam and it worked great. I did use some thin Kydex to reinforce the inside of the back wall and the sides for strength. For the cross, I just cut one out of 3mm foam and glued it on - I was pressed for time.
--- end update
Cuffs - Update 9/3/2014
For my recent event, I had no cuffs at all, so I decided to make some not very screen accurate ones just to have something on the belt. Again, thanks to Studio Creations, there is a build sheet for the cuffs. I simply used some of my spare .028" Kydex to fashion the top and the bottom pieces. I then cut strips of the kydex that were a little thicker than the zip ties I had to make a channel down the center of the plates. I glued those in, making sure to leave enough room to two zip ties. Next, I took 4 layers of kydex and made the outside piece where the two ties are held in place. For the last bit, I just glued in some 1/4" craft foam to fill out the thickness. After that, I hacked up the foam to fit and the ends of the zip ties and glued them in. I wrapped the zip ties in place and glued them together at the ends. Next, glued the top on and call it a day.
Craft foam sandwiched between kydex. |
See the channel created with the kydex? |
Carved areas to fit the ends of the zip ties. |
Screen accurate? Absolutely not - these are not long enough or thick enough to match the screen. Cost? Probably $.25 and they are better than nothing. I could have probably done something with the ends, but I was in a big hurry and I can always chop them off and make them better later.
Flash Bang Grenades Update - 9/5/2014
Originally, I just had nothing in my flash bang pouch. This was fine, but I cannot keep the build static, so I got busy building some grenades! Apparently, the ones used in the movie were 1.75", which is a little larger than a ping-pong ball (40mm). I figured that these would be close enough! I looked into ordering these, but found you can really only buy a bunch. This took me to my local sporting good store where I got 6 balls for about $4.
Hold your ping-pong ball up to a light and note the natural line running right around the middle of the ball. This is where the two halves join. Use your sharpie to trace this so you can see it.
Next, use the tip pictured above in your rotary tool to slowly and carefully grind away at the line your just drew.
Use sandpaper to clean this up
To trace a line for the switch, I used the inside of a roll of electrical tape. I held this tight to the ball and just traced a line with my trusty sharpie.
I used the same technique as above to grind out the switch. Be very careful on this part, as the material is only half as thick as the middle part.
I used some thin wire to secure the ball and paint it. When this was dry, I used a brush to fill in the area around the middle and paint in a red indicator. Then, I used some black wash to darken the depressions. Last, I sealed the ball with a matte spray.
Screen accurate? Nope. Cheap and looks good on the belt? Yep!
--- end update
Judge Dredd - The Boots
This is part of the Judge Dredd series of posts. See the Main Article for more information.
Last Update: September 18th, 2015.
Update: September 18th, 2015:
I went ahead and ordered some toe caps from Bawz Props. Make sure you use IC-2000 rubberized superglue to attach these things - none of my regular glues work.
---- End Update
--- end update
UPDATE - 9/22/2014
I recently ordered some suede for another project and took the opportunity to order some extra to upgrade my boots. In keeping with the build it, wear it, upgrade it philosophy, I am upgrading the boots to have the inside suede heat-shield seen on the Dredd boots.
As you can see, my boots are not exactly the same as above, but I think I can add some suede to give more of the look of the screen boots.
For materials, I ordered half a yard (WAY too much) 6807 Ultrasuede Heavy Weight #6807 Ash from Fields Fabrics. All darkened up, I think that this stuff is pretty close.
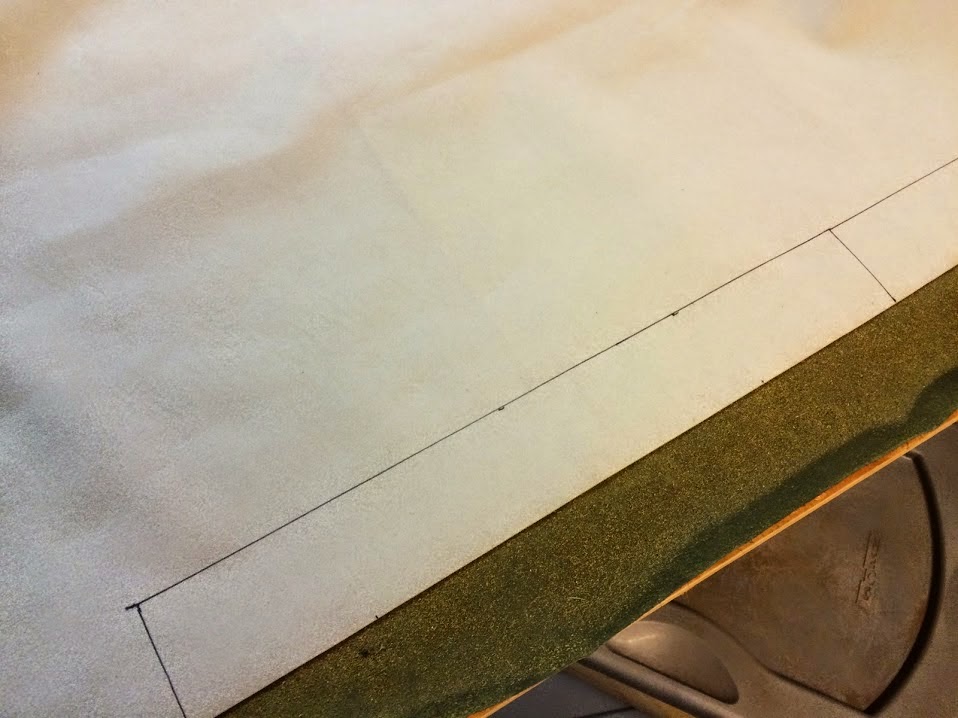
Above, see me making a template. I love to use painter's tape and paper - so easy! Since the area I want to fill is recessed, I simply tape along the edges and push it down with my fingers. Once the tape is good and in there, I use a pen to make sure I get the line correctly. Next, cut out with a hobby knife.
Above, see the two pieces of suede I cut out. I went over them with a little flat black spray paint. I went pretty light, as I can always add more later. DO NOT try to actually burn these black, as that will only ruin the fabric. At least, that is what I hear. >.<
I used hot glue to attach the suede to the boot. I made sure to go lightly and to apply pressure to the suede to keep the bumps to a minimum.
To give a finished look, I cut another piece of suede for each booth. The piece is about 2" wide and 15" long. I made sure to darken them up a lot with the black spray paint, as I think the originals are actually black.
I glued the trim piece around the top. I made sure to stretch out the boot tongue flat to glue the pieces on. I cut the trim as show above to give a more finished look.
Above, see the finished boot. I will weather and such to make the whole thing match. I am pretty happy with how this turned out. I think the boot looks much closer to screen now.
--- end update
Read More
Last Update: September 18th, 2015.
The Build - The Boots
This was going to be a challenge, as there was really nothing available at the time I was building. I believe that some screen-accurate boots are on the way, but I had to scrounge for something. Again, I did a ton of research and settled on some older O'Neal Elements for about $80 on eBay.
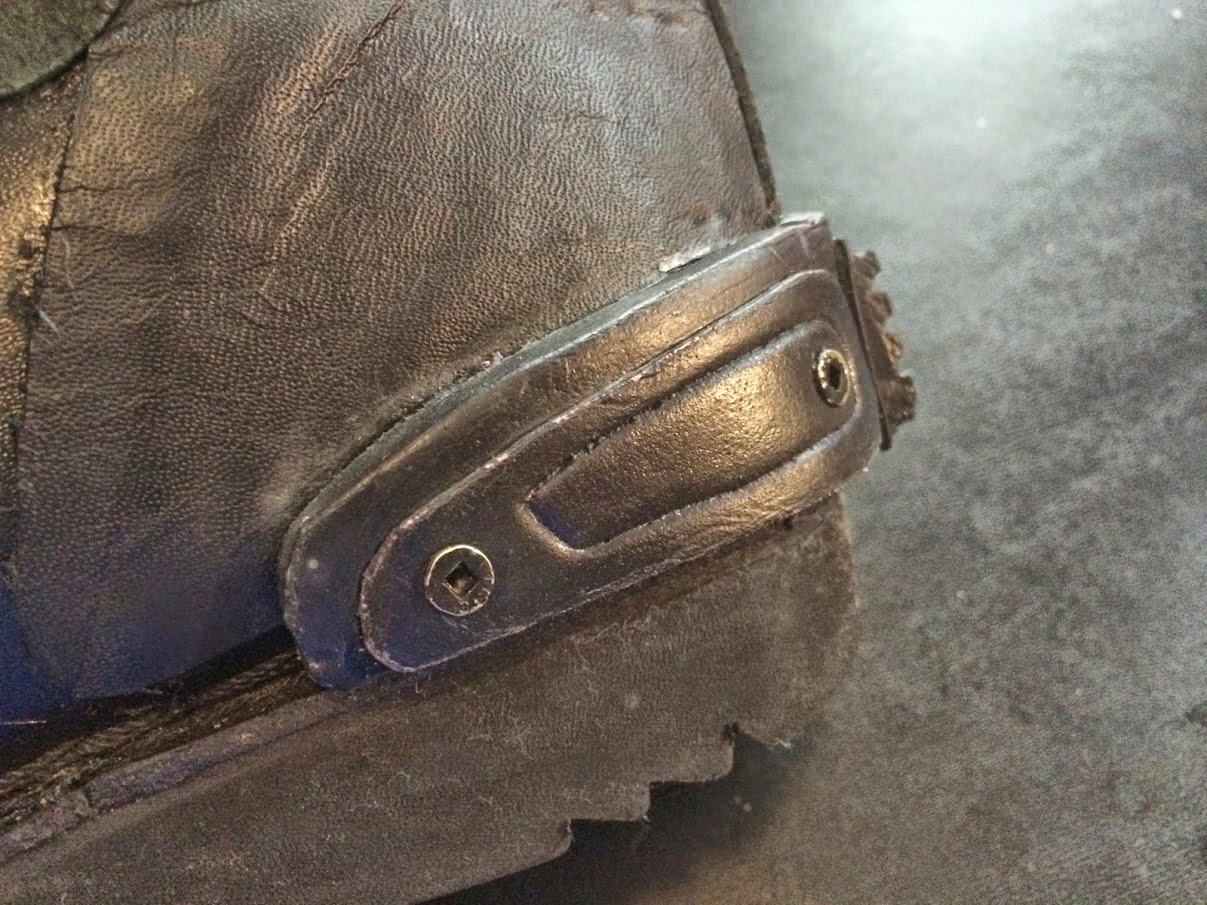
The first thing I did with these boots is to rip off all of the plastic and such that did not fit the build. You can see where I cut off areas and replaced them with some cheap leather or suede pieces. I decided not to alter the number of buckles (they should have 3, not 4) as that just seemed too involved. I took my trusty silver sharpie and made the fasteners look more like the screen-used ones.
Once that was done, I set about making the heels and toes. The heels were just craft foam cut out to look like what I saw in pictures on the web. I made a paper template and went to town. I hand-sanded the craft foam to get the proper look. I used a ballpoint pen to draw in the shallow lines on the heels. I also found some brass screws that looked good enough to attach to the foam. Plastidip and paint.
Update: September 18th, 2015:
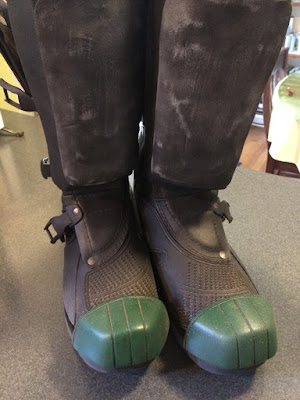
I went ahead and ordered some toe caps from Bawz Props. Make sure you use IC-2000 rubberized superglue to attach these things - none of my regular glues work.
---- End Update
For the shin guards, I used the template in the instructables. This was difficult to assemble and I wish I had a better idea for how to make these. My shin guards look a little concave, but they are passable. I actually ordered some from a vendor, but they were WAY too small for my boots (size 11). After building and painting, I simply used Velcro to attach to the boots.
UPDATE - 8/25/2014
I worked on the shins, and I think I have something acceptable. I built up layers of craft foam to fix the concave surface of the shins. I then added another, slightly larger front piece to look fairly close to the Dredd ones. These are not perfect, but much better.
OK from this angle... |
...terrible from this one. Will be fixing soon. |
I worked on the shins, and I think I have something acceptable. I built up layers of craft foam to fix the concave surface of the shins. I then added another, slightly larger front piece to look fairly close to the Dredd ones. These are not perfect, but much better.
--- end update
UPDATE - 9/22/2014
I recently ordered some suede for another project and took the opportunity to order some extra to upgrade my boots. In keeping with the build it, wear it, upgrade it philosophy, I am upgrading the boots to have the inside suede heat-shield seen on the Dredd boots.
This is what the movie boots look like. Picture from Studio Creations. |
My O'Neal boots. |
Above, see me making a template. I love to use painter's tape and paper - so easy! Since the area I want to fill is recessed, I simply tape along the edges and push it down with my fingers. Once the tape is good and in there, I use a pen to make sure I get the line correctly. Next, cut out with a hobby knife.
Above, see the two pieces of suede I cut out. I went over them with a little flat black spray paint. I went pretty light, as I can always add more later. DO NOT try to actually burn these black, as that will only ruin the fabric. At least, that is what I hear. >.<
I used hot glue to attach the suede to the boot. I made sure to go lightly and to apply pressure to the suede to keep the bumps to a minimum.
To give a finished look, I cut another piece of suede for each booth. The piece is about 2" wide and 15" long. I made sure to darken them up a lot with the black spray paint, as I think the originals are actually black.
I glued the trim piece around the top. I made sure to stretch out the boot tongue flat to glue the pieces on. I cut the trim as show above to give a more finished look.
Above, see the finished boot. I will weather and such to make the whole thing match. I am pretty happy with how this turned out. I think the boot looks much closer to screen now.
--- end update
The toe caps were the scariest piece, so I saved it or last. With the shin guards being too small, I figured anything I ordered would be too small too, so I decided to make these. I needed a pattern, so I used blue masking tape to create a toe cap on the boots. I just put on layers of tape over the toe until I was 3-4 layers in. I then took a razor blade and cut away tape until the toe cap looked right. Next, I used a sharpie to draw in the panel lines as seen on the Dredd boot.
After peeling off the tape, I cut along the lines I drew and had my pattern. I used the templates to cut out 2mm craft foam and heat-shaped to fit. There were some gaps between the foam I cut and the soles of the boots, so I just cut out several strips of craft foam to fill in the open spaces, building up with layers. This created a much better base to glue the caps on.
Hot glue was used to attach to the boots. I then used a ballpoint pen to create the line around the top edge. Seal with white glue and paint (after masking). I used the Hunter Green paint suggested, but I found that to be WAY too bright. I went back and misted on some flat black until I got the shade I wanted.
I feel like the toe caps and heels are still a little soft. I got some gouges on them at my first show, so I will be looking to strengthen them. I think I will try another couple of layers of white glue. Maybe I will mask again and hit them with some plastidip.
Subscribe to:
Posts (Atom)
Popular Posts In the last 30 Days
-
Hey Bolt Action fans, Bryan here with a guide to modelling and painting some Hungarian infantry. To give any potential Hungarian players ...
-
Well it's been a busy month on this army project with the Panzer scouts very close to having the initial 1000pt army all painted up, ...
-
The Panzer scouts have finally hit the table and even played through their first two day Bolt Action event, taking the 'Best Axis Gen...
-
By Bryan, Artillery units present great opportunities to create a mini diorama as the center-piece of your Bolt Action platoon, while s...
-
With the new Bulge compilations on the horizon, one of the new lists being added to the Allied compilation are light and medium tank compani...