


By Bryan,
Artillery units present great opportunities to create a mini diorama as the center-piece of your Bolt Action platoon, while still remaining game play compatible. Here in this tutorial I'll show you a simple process for creating one which doesn't require a lot of skill or time. I'll use my recent added PAK40 team for my Royal Hungarian Army as an example.
Scenic bases step by step
The aim of this process is to create the coolest looking gaming piece while keeping it exactly that, a gaming piece. This means we want the crew to be able to be removed as casualties (inevitably) mount... Removable crew are not hard to do, it just takes a little planning. This tutorial is a fairly basic one, for a more spectacular result, check out my mate Dennis' in depth guide here. You can easily mix and match techniques from both these guides to suit your tastes.

Step 1: Materials
The first step is to gather what you need to make yourself a scenic base.- A Base. You'll need a base large enough to allow the gun and the 3-5 crew to slot in around it. I have gone for a Renedra plastic base that is an oval shape, 115mm x 88mm. It's large enough for my PAK40 and it's 4 crew, but no so large that it will impede where I can place it among terrain on a typical gaming table.
- Texturing material. A large part of making my scenic bases (and normal bases for the matter) is to use Polyfilla to 'fill' the base with an earth-like texture. I picked this up from the hardware store here in Australia, so it may go by another name wherever you are reading this. Basically it's a product for smearing over holes in walls, and is easy to apply and dries rock hard after a few hours. You can also add to this after it's applied with some small gravel or rocks if you have some.
- Scenic elements. To add some narrative and detail to your scenic artillery base I often collect spare bits and pieces from other kits to add to the base. Here I have some sandbags to create a dug-in emplacement feel. Spare ammo crates, felled tree trunks, weapons, fuel drums and barbed wire are all great to include depending on the theater and type of look you are going for. There are many possibilities, look up period photos for inspiration and let your imagination take over for a bit.

Step 2: Planning
It's going to be a squeeze to fit on the gun, crew and scenic elements onto the base, so it's best to dry fit the components and play around with how they will be arranged first.I have decided to make one of my crew separate to the large base to leave room for the earth barricade I want in front of the gun. I think that's okay as he can be the first casualty removed if needed. I am also going to paint an extra gun (a Nebelwerfer) so I can swap between this and the PAK40 in different games and use the same crew and base. So at this stage I check to see if the Neb' and PAK will both fit in the same space.

Step 3: Guides
Once I am happy with how the gun, crew and scenic elements will roughly be arranged I use a pen to mark up where the bases of the crew need to be. This is important as we'll be building up the earth texture everywhere except in these areas, so we need to know where to leave the space for them once we take all the parts off the base again.
Step 4: Textured filla
With clear guides in place I proceed to smear the basing texture material (Pollyfilla) all over the base except for where the crew bases will 'slot in'. My aim here is to create nice rough texture that will drybrush well later, but also build up a reasonable amount of depth so that there will be circular recesses left for the removable crew to slot into and seamlessly blend with the scenic base. I need to build up about 2-3mm of height around the crew slots to allow for the thickness of the crew models bases once they are in their slots. I use a sculpting tool to apply the Pollyfilla to the base, and also poke it around to rough it up a bit and create the texture.At this point, you can also simply apply the same texture to the crew's 25mm round bases at the same time.

Step 5: Extra details
At this stage the Pollyfilla will take about an hour or two to dry so I have time to now add the scenic elements. Here I have some sandbags and spent shell casings to add. These can simply be pushed into place on top of the Pollyfilla.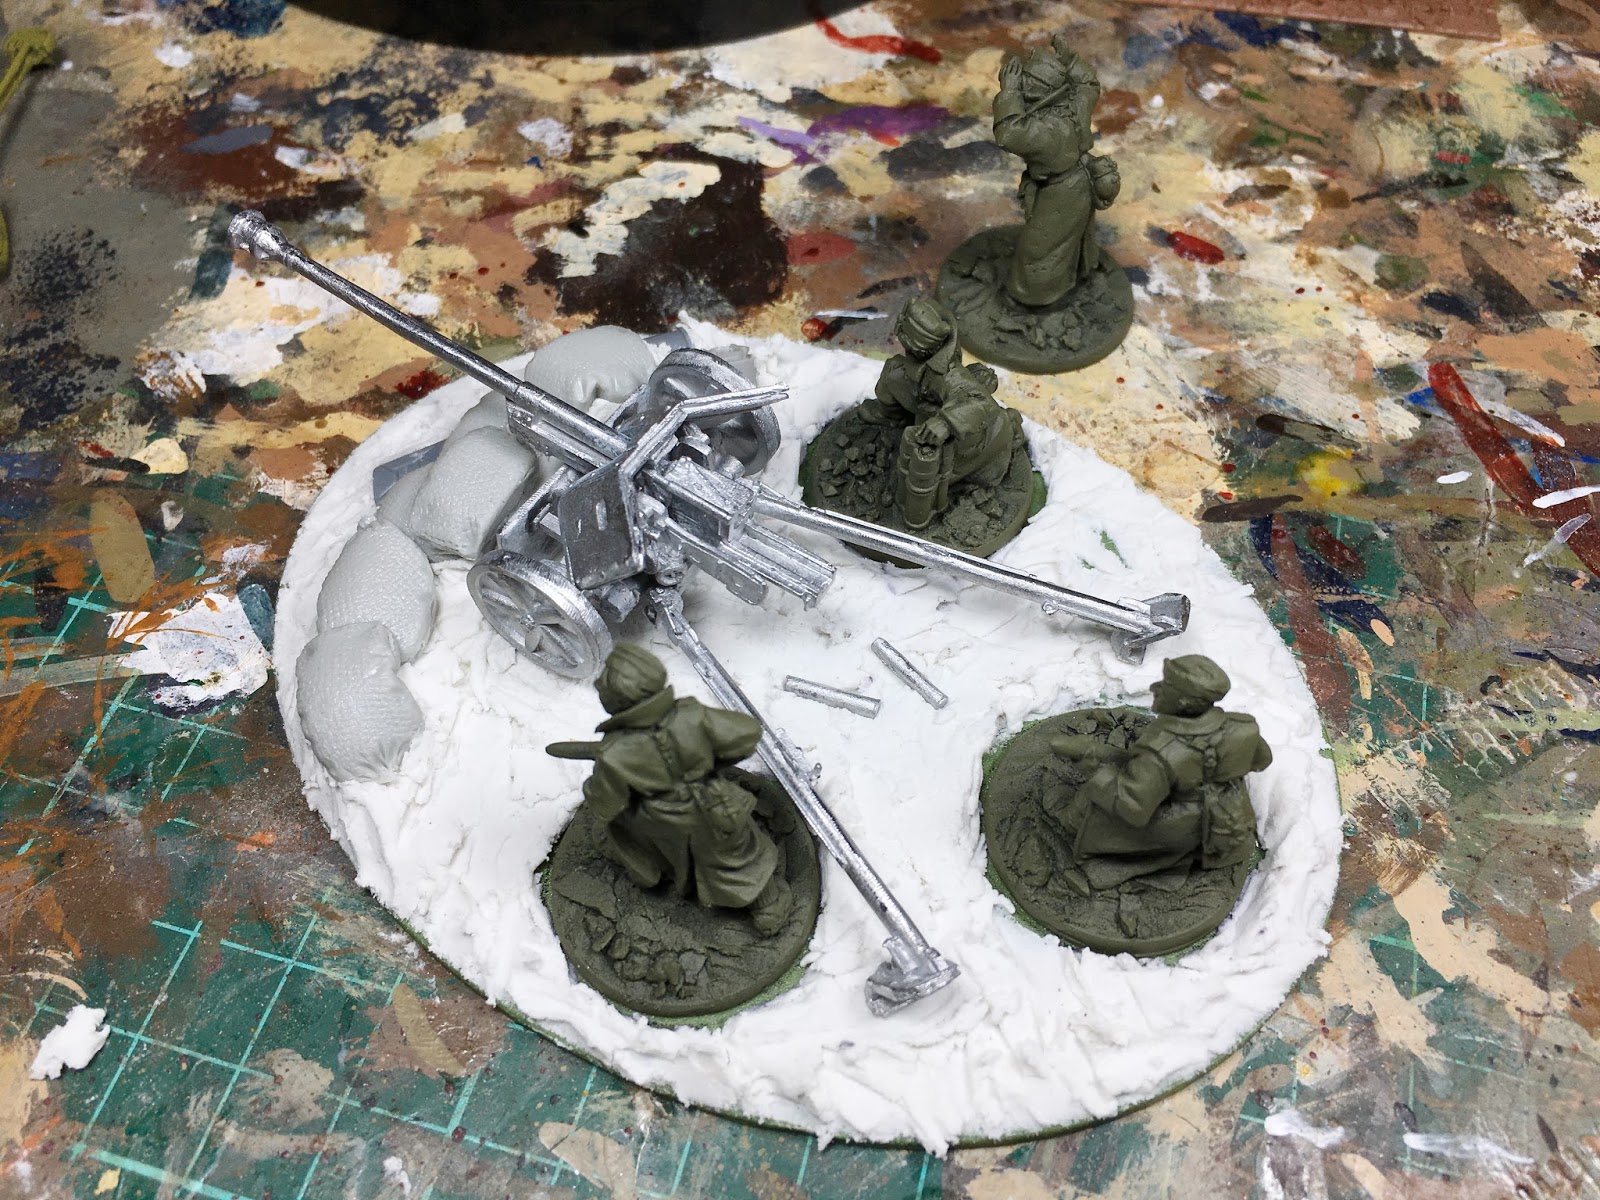
Step 6: Test fit before it drys
Before the Pollyfilla sets hard, I put the crew into their slots and twist them around a little to make sure they will in fact slot in easily once it drys.
Step 7: Add more texture
With the Pollyfilla almost dry, I now add some patches of extra texture using some kitty litter and small gravel in a mixture. Again, just push in piles of the stuff where you like, I don't cover the whole base though.After applying the gravel, it's a good idea to coat these areas with some watered down PVA glue to really seal them in, the drying Polyfilla won't have enough of a bond to hold it on by itself.
Step 8: Painting
Painting is really straight forward. Choose an appropriate base colour for the type of ground you want, whether it's mud, earth or desert sands. After a base coat, I drybrush 2-3 highlights of successively lighter colours using a very large brush with soft bristles.
For this eastern front earth example I used;
Basecoat: GW Rhinox Hide
Highlight 1: VJ Flat Earth (983)
Highlight 2: VJ Flat Earth (983) + VJ Buff (976) 70/30 mix

Step 9: Adding basing materials
Time to add some appropriate basing materials in the form of foliage to really bring this scenic base to life. Here in this example I have used Gamers Grass 'winter' and 'dry' tufts. These look great and are easy to apply straight onto the base with a little PVA glue. I have also made use of a spongy grass material from a model railway supplier. Finally, to get that frosty winter look I simply wet brushed some white paint over all this at the very end once the PVA glue holding it on was dry. Wet-brushing is similar to drybrushing but with more paint and a little water in the mix. For this specific technique, dry-brushing is too harsh and doesn't apply enough paint to the grass tufts and foliage. I even wet-brushed the white onto the earth areas for ground frost.


Here is the PAK40 and Nebelwerfer painted at the same time in the same standard issue late war Dunkelgelb colour scheme. The red and white striped poles on the gun carriage arms are the range marker poles the crew often use.

A rear view of the finished scenic base for the PAK40/Nebelwerfer. You can see that the crew's bases now fit in without looking like they are in fact on separate bases to the gun.


Other examples
You can use this tutorial for guns in any of the environments the artillerymen of the Second World War found themselves in. Here are some other examples of this same tutorial.

Base colour: VJ Brown Sand (876)
Wash: Army painter Strong tone ink
Highlight 1: VJ Brown Sand (876)
Highlight 2: VJ Dark Sand (847)
Highlight 3: VJ Pale Sand (837)


Next up is an Australian 25PDR from the 9th Division in the jungles of New Guinea. To get the jungle look I have made extensive use of plastic aquarium plants, lichen and tall grass.


Lastly here is a 105mm howitzer from my French force. It's colonial artillery from either the Vichy French Levant (Syria) or the garrisons of the North Africa, so I have used the same desert colours and basing material as the DAK PAK38 earlier.


Well that's it! I hope this little tutorial gives you both inspiration and info on how to create your own scenic bases for your artillery units and even team weapons. For more army inspiration be sure to follow us on Facebook as we post images of our latest projects.
If you have any questions, just ask away in the comments section below.
If you have any questions, just ask away in the comments section below.


