


I'm baaaaAAAAaaaack....The recently released Nachtjager for Flames of War by Battlefront covering the battles in Northern Germany and the British crossing of the Rhine (March-May 1945) during Operation Varisty and Plunder added a new deadly combat multiplier to the Germans arsenal...Night Vision! I will be doing a series of reviews on these new toys and we start with the Uhu!
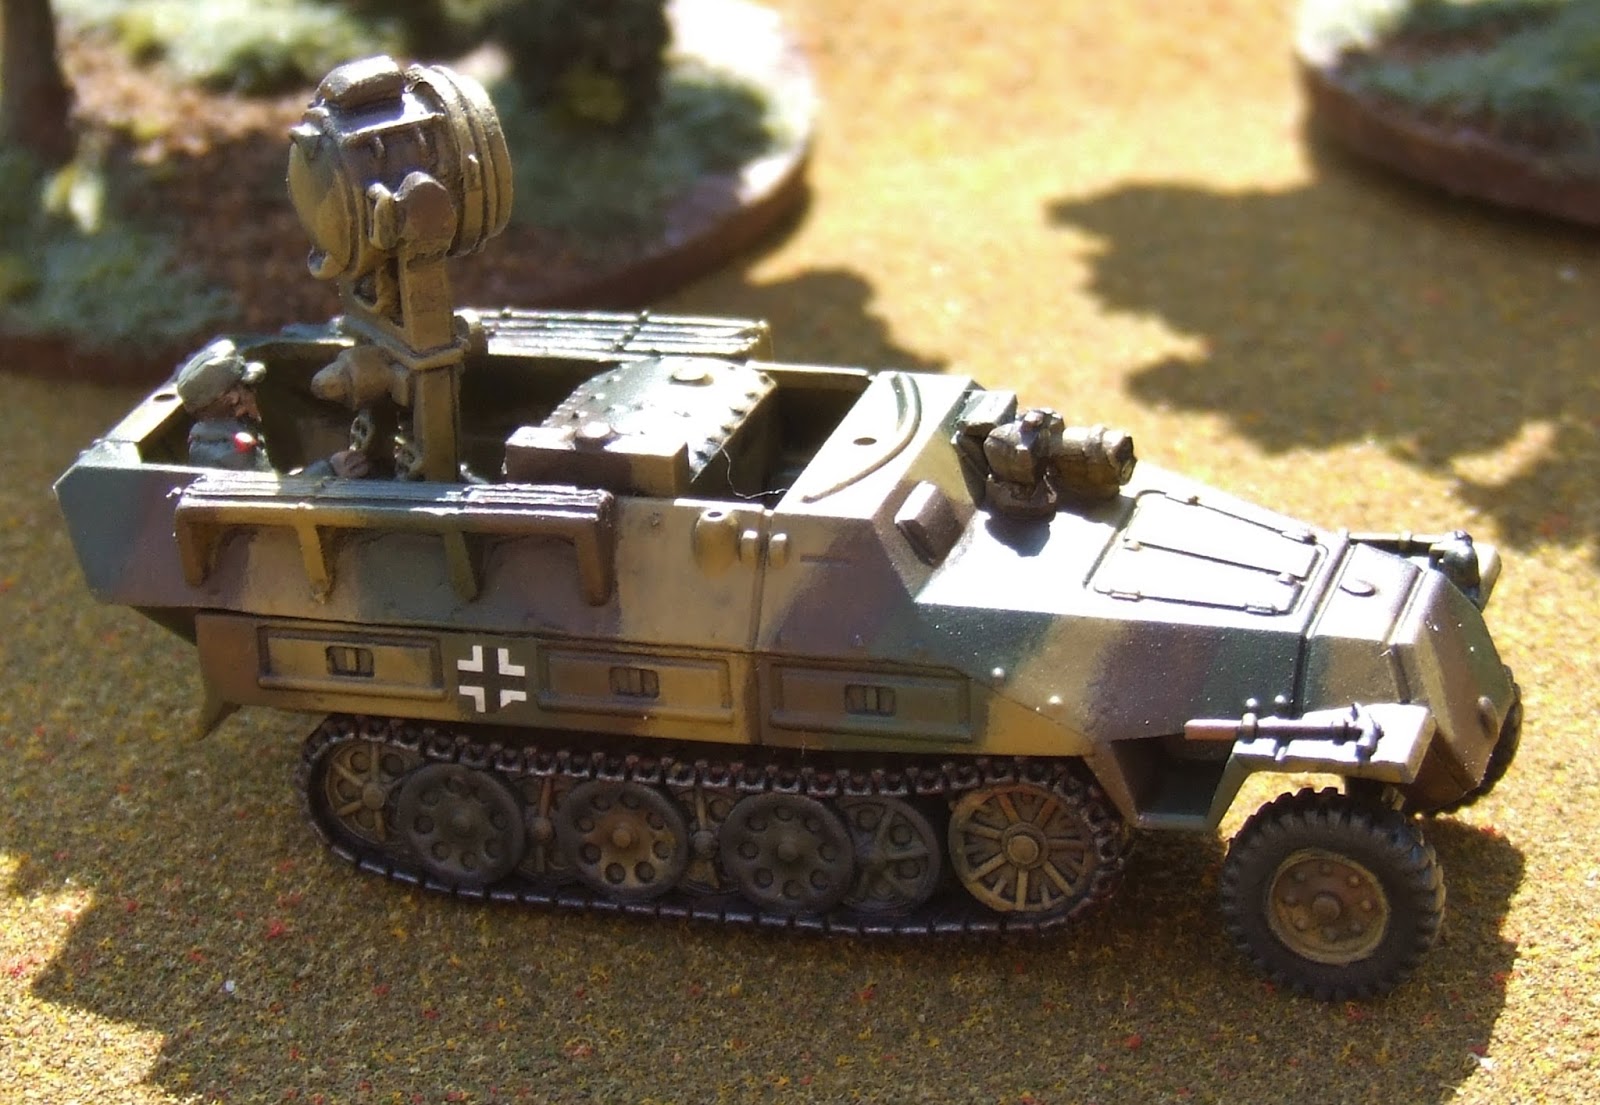
The Uhu (GBX82) was based on the versatile Sdkfz 251 Haftrack chassis where a big ole honkin' Infra Red Searchlight was added in the crew compartment. The IR Searchlight was used to illuminate a target with IR so other IR night vision equipped units could see it with their passive devices. Just like spotlighting deer....never mind, I didn't say that.
Now, this set uses the new plastic half track Sdkfz 251 with metal searchlight and drivers IR sights. This review will cover just the Uhu unique parts. There will be a forthcoming review of the Sdkfz 251 Transport Platoon plastic set (GBX85) and the Sdkfz 251 Night vision set (GSO206). As a disclaimer, I also wanted to add that these models were purchased by me and not furnished by any company for review.
Assembly: Very straight forward and quite similar to the Plastic Soldier Company Sdkfz 251 Auf C plastic set which I have also built. Battlefront in their great wisdom (all praise be unto them) have a very nice on line assembly guide. The only real trick is to dry fit the search light compartment before you glue it down and assemble the rest of the half track. You will most likely have some trimming to do on the metal base to make it fit snugly and have it ride low. I learned the hard way...
 |
| Without trimming and sits too high is on the left |
 |
| Too high |
 |
| Just right |
One other thing on assembly and something to keep in mind when you use these models. They are VERY back heavy and can pop wheelies pretty easily.

If the hull were resin, I don't think you would have this slight problem. If you add some weight up front, like a clump of putty, in the engine compartment this issue goes away.
Using my tried and true review metric we have:
Accuracy: It is one the heroic side so there are some 1:1 accuracy issues. All the key visuals appear to be there. The heart of the Uhu is the search light and the rest of the module in the crew compartment.
 |
| http://www.achtungpanzer.com/votw/251_20.jpg |


Rating: 8/10 First is my 1 point standard deduction for epic scale...all the right pieces are there, just a little thicker for durability and to make the model easier to paint..although I love it, its just not "accurate." I also docked a point for the scaffolding. In the pictures of actual Uhus the scaffolding is shorter and stops just before the generator/fuel tank and only have 3 supports. The model extends past the generator and has 4 supports. I did find a lot of pictures of scale models with 4 and even 3 supports that had the longer scaffolding, but no pictures of actual Uhus with this. The scaffolding cut be cut back to 3 supports very easily and then the "issue" goes away.
Quality: Very nice sculps. The half track is the new plastic body and tracks. No flash/mold lines issues there at all. I didn't have to clean any plastic at all. The metal bits...the operator, the searchlight and the crew compartment insert were all pretty clean. Just a little flash "whiskers" on the operators headgear and the Search light that had to be cleaned up. The biggest is that you need to check the fit of that crew compartment. I had to file down one (and should have done the other one) to get a proper fit.
Rating: 7/10 due to the crew compartment fit
Versatility: Modelling opportunities are pretty few out of the box. It centers on whether or not you use the seated figure or not; have the search light face left or right; and whether or not you paint it with the searchlight on or off. There are no stowage items included to "unique-ifie" the model, etc... Add to this the Uhu is only in a single book right now...but and its a big but (I like big buts I cannot lie...)...the Uhu is a key part to each of those lists, and it can be run with a lot of different armored units which add to the versatility. Also, you can always spruce up your Uhu with stowage bits from your bits bin or from Battlefront Special Order (GSO180 German Half-Track Stowage)...there is room on the model to take those items.
Rating: 7/10 based mostly on no stowage being included in the box.
Paintability: High marks here. The model has great depth of detail and takes paint very well. These are among my best painted and looking half tracks...all of which are plastic.
Rating: 10/10
Overall: 8/10. The longer scaffolding, lack of stowage options and fit of the crew compartment insert brought the score down a tad...but, this is still a great quality model and if you cut down the scaffolding, don't mind not having stowage (or have extra to add) and pay attention to the fit of the crew compartment insert it is a 10/10 for sure. I really like mine.
Now, how exactly did I paint these...very simple really. The Nachtjager book has a nice section on how to paint the half track with the searchlight "on" or "off".
Here is how I painted the pair up:
1. Primed the track in Vallejo Surface Air Primer Brown Yellow.
2. Drybrush the entire vehicle and searchlight with Vallejo Middlestone 882
3. Airbrushed on the camo pattern, first using Vallejo German Camo Dark Green 979 and then Vallejo Chocolate Brown 872. I went with a later war camo scheme with thicker Green/Brown bands that touched each other.
4. Painted the tracks using a base of Vallejo Flat Black 950, then Vallejo Cavalry Brown 982, followed by a drybrush of a mix of Vallejo Gunmetal Grey 863/Vallejo Flat Black and a final highlight of straight Vallejo Gunmental Grey.
5. Next I did the IR searchlight. I wanted the searchlights to be "on," so I started with a base of Vallejo Flat Black, then built up a little layer using Vallejo Violet 960 with a little 2 brush blending up to Vallejo Purple 959 making the center more purple and the edges darker. I then added a vertical lines using Vallejo Flat Black to show the internal louvers being open. Next I added a few reflections on the edges with Vallejo French Mirage Blue 900.
6. Now, to give it a darker blue tint I did a wash using CGR Painters Black Magic Mudd mixed with Privateer Press' Blue Ink. Wash it just enough to blend all the colors and tint the whole surface.
7. Next, I moved on to the other IR sensors. First is the searchlight sight just below the actual searchlight and the ones in front of the driver. This same process can be used to show the searchlight in an "off" position. This is a simple Vallejo Flat Black base and then a few reflections on the edges with Vallejo French Mirage Blue 900.
8. The next step was to high light the camo sections. Here, I used thinned Vallejo Reflective Green 890 in the green areas and thinned Vallejo German Camo Medium Brown 826 for the brown areas. You want to work from the center out and leave the edges darker. I also use this time to clean up any areas in the green or brown camo spots where I had little "mishaps" or overspray/splattering issues.
9. The last paint step is to use thinned Vallejo Middlestone to cover up any areas in the Middlestone that need clean up. The biggest purpose of this step is to clean up around the camo spots. Thinned paint is a must and with a sideways stabbing stroke along the camo spot you can clean up any "overspray" and still keep the airbrush look.
10. I then gloss varnished the entire model, applied decals and added CGR Painter's Black Magic Mudd to help bring out the panel lines.
11. To kill the gloss varnish shine, I hit the model with a nice flat matte finish.
12. But what about the glass surfaces of the Searchlight and night vision sights? To help those look more like the glass surfaces they were, just put a little gloss varnish where the glass would be.
Picture time!
 |
| See the louvres? The gloss shine didn't show in the sunlight, but it's there. |


There you go...now go out there and have fun in the dark!
SonBae (AKA Jeff Flint) is a long time gamer and painter and runs a semi-active blog at Journey Back To The Table where he posts photos of his work, reviews, BatReps and the “Painting Miniatures Declassified” modeling and painting tutorials. Follow him @wwpdSonBae on Twitter.


