


I have been asked to do a step-by-step on the weathering that I do by some members of the community and as such, I bring you this article. A caveat first and foremost though, I do not pretend that I am some type of pro-painter or have come up with these methods all on my own. I do hope however to introduce some of these techniques to those in the community who may be just starting out and want to know where to begin. I will try and break it down as much as possible, however if you want to know more or want clarification than please get in contact with me via the Bolt Action Alliance Facebook page.

Step 1 - Primer, Base coat and Light Modulation.
I didn't take any photos of this stage as there is a lot of information and guides about modulation out there, however I will talk you through the basics (I used an airbrush for these stages). I primed the tank with an AK Interactive black primer (AK178) and followed this up once dry with a quick spray of white from the top of the tank and only hitting the panels that face to the sky, this is the start of some light modulation. I base coated the tank with a Vallejo Dunkelgelb (RAL7028) and the areas I sprayed white before are already lighter than the black areas which gives you a nice base to work on when adding lighter and lighter layers.
Looking at the top of the tank I sprayed on lighter and lighter layers in smaller areas each time, by adding some white to the dunkelgelb until I was happy that it looked like the source of light was coming directly from the top. By doing this type of light modulation it will greatly assist you when you weather the tank to make it look more natural. I have just started this technique so am just a beginner myself and have a lot to learn yet. If you do not have an airbrush you can still do the following techniques however the end result may not be as realistic.

Step 2 - Tracks, accessories and an oil wash
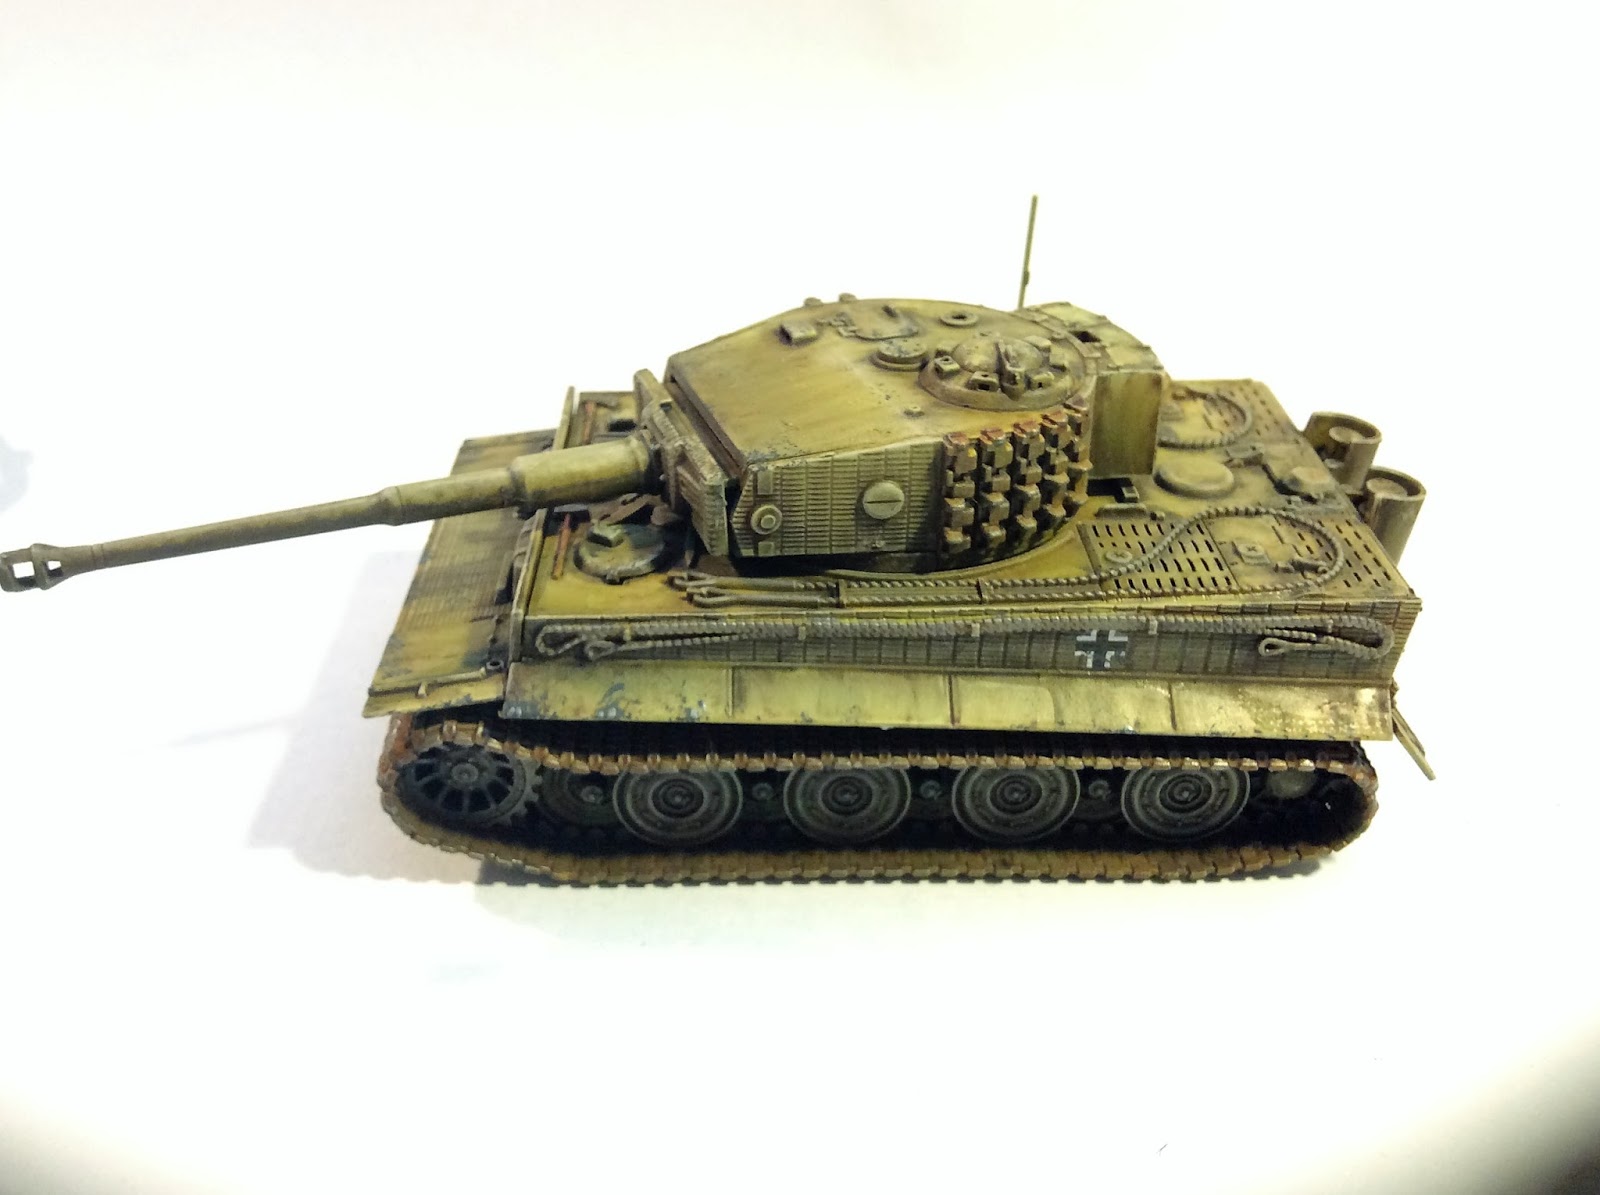
I painted the tracks with (AK721) 'Rusty Tacks' with the accessories a mixture of brown and metallic. The next stage is to protect what you have done so far, as you will be using a solvent which can strip your base coat so I added a nice coat of satin varnish. Once dry I mixed some solvent with an umber oil paint to create a very thin wash and applied it to all areas of the tank. This wash acts as a filter and will change the colour of your base coat and take much of the shiny newness away and is the first stage in weathering the tank. I use an odorless solvent as the smell can be very overwhelming and you can pick these up in most hobby shops for a relatively low cost.

Once the oil wash is applied I take a cotton tip and dip it in solvent, dab off the excess and clean up the wash. I do this by moving the cotton tip in a vertical motion down the side of the tank and deliberately leave streaks and areas around depressions and equipment (see below). Be careful not to press too hard when removing the wash as even though it is protected by a varnish the solvent is powerful and you may begin to strip the base coat. Once done apply another coat of varnish to protect this layer.

Step 3 - Darker wash and clean
For this stage I use a AK Interactive dark brown enamel wash for green vehicles, although it is labeled for green vehicles I still like the way it looks on other colours so call me a rebel. I generally apply this in a spot wash technique which is being selective where it goes, primarily it should go in the recesses such as panel joints to make them stand out. You can afford to be very brutal with your application as you can easily clean it up with the solvent. Use this layer to reinforce the streaks and make those joins in the tank really stand out.


Step 4 - Light Bone drybrush and decals
Once this wash has been applied and is dry I like to use a light drybrush with bone white to really bring out the edges and bits that stand out. Remember that we are painting a tank that will be pushed around a table and it is nice for it to pop from four feet away and this is one way to do it. I then apply any decals to the vehicle to avoid any issues with solvent in any of the previous stages.

Step 5 - Chipping
For this I use a Vallejo Model Air German (71.052) and just some packing foam from a blister pack. I dip a corner into the paint and dab most of it off before applying it randomly to areas of the tank which would see some wear and tear such as around hatches and points around the exterior where it would make contact with other objects. Do this sparingly as you do not want it to dominate the tank, just complement the other weathering techniques. If you want to add another layer place some metallic paint in small amounts within the chipping to represent going all the way down to the metal underneath. Make sure you place some chipping over the decals to make them blend in.


Final Step - Varnish and play
Put some varnish on as above all else this tank is meant to be played with and pushed around the table accompanied by appropriate noises as it lays waste to all around it. You can of course do any number of other things to weather this tank such a using powders or enamels to represent dirt and dust or use different washes to create more streaking but lets leave it there for the moment.
If you have not done any weathering before I hope that this may assist you as it really takes the tank to the next level of detail. Look up different techniques and give these things a go as that is the only way any of us can improve our painting. I hope you have enjoyed a basic introduction to the way I weather my vehicles.


